
|
|
|
|
|
|
POWER WINDOW SERVICE
1983 Ferrari 308 GTS QV US-spec
By Ken (zff on FerrariChat.com)
Written in Jan 2009
[ INTRO | TOOLS | PARTS | DIAGRAM | PROCEDURE | CREDITS ]
Slow power windows are a common problem among 80s-era Ferraris. The primary cause is a hardening of the original grease that was used in the window drive mechanism. Another contributing factor is a significant voltage loss due to the age and length of the wires leading to the window motor. The best way to fix this problem is to relubricate the window drive mechanisms with a modern plastic-safe lithium grease and install window accelerators. Window accelerators do not strain your electrical system; they only allow it to operate at the proper voltage. It's very unlikely you need new window motors.
I also replaced the steel cable that operates the window. New cable is more flexible and much easier to work with, it's cheap (less than $5) and I think it's easily worth the peace of mind. (A note for the originality obsessors: As part of my procedure for replacing the cable, I permanently modify a part by drilling a hole in it.)
I did both doors and documented the procedure for the driver door here. I took photos of both doors and their components, but photos from the passenger door have been flipped to make them consistent for the driver door. The service procedure for the passenger door is the same except it doesn't have the power mirror controls.
Aside from a good set of sockets, wrenches, screwdrivers, etc..., you'll need:
- Citrus solvent
- Small wire brush
- White lithium grease
- Locking needle-nose pliers
- General purpose tape
- Wire cutters (strong enough to cut the steel cable)
- Drill with 1/4" bit
- Crimping tool (to crimp the stop ferrules on to the ends of the cable; a vise or large pliers may work)
- Dry spray lubricant
- Electrical connectors and corresponding crimping tool
- Electrical tape
- Permanent ink marker
- Zip ties
- A file or even better, a powered sander (I used a Dremel)
- At least 11' of 1/16" galvanized steel cable (for each door)
- Stop ferrules for the cable
- One window accelerator for each door. (I ordered mine from Ricambi America. They were $175/pair including shipping (Dec 2008), but you can find them cheaper elsewhere. I'm pretty sure they are all installed the same way, but this procedure was written for the ones from Ricambi.)
This diagram is for a 1978 308, but it's nearly identical to my 1983. There's only a minor difference with the power mirror switch. I'll use the numbers in this diagram when referring to parts. The window drive mechanism (#68) will be disassembled further than in this exploded view.
- You don't have to disconnect the battery.
- Start with the window in the FULLY DOWN position.
- Disconnect power mirror controls
- Remove armrest and door panel
- Remove liner and speaker
- Disconnect the window
- Tape window in place
- Remove window drive mechanism
- Disassemble window drive mechanism
- Disconnect old cable
- Clean everything
- Connect new cable
- Wind new cable
- Lubricate and reassemble window drive mechanism
- Connect window accelerator
- Reinstall window drive mechanism
- String cable
- Reattach window
- Reassemble door
You can skip this step if you're doing the passenger door.
Remove the 2 small screws holding the cover to the front part of the armrest (#78).
(click on the photo to see a larger version)
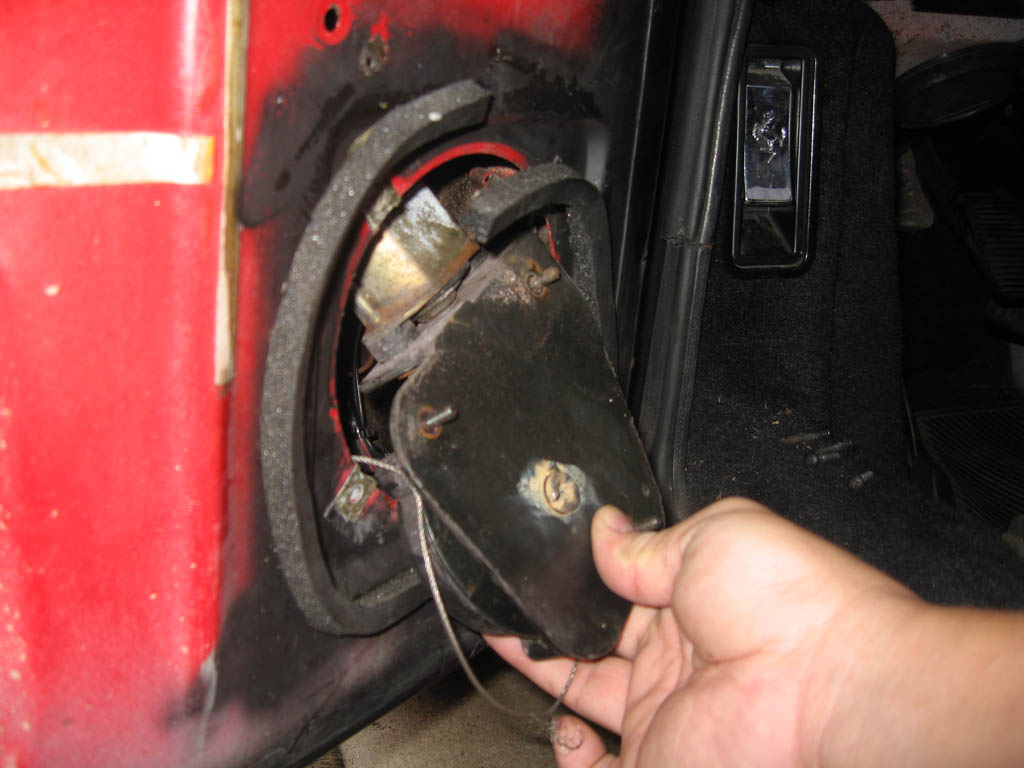
Remove the little guard piece near the door latch (#33).
This photos shows you where all the fasteners are:
(click on the photo to see a larger version)
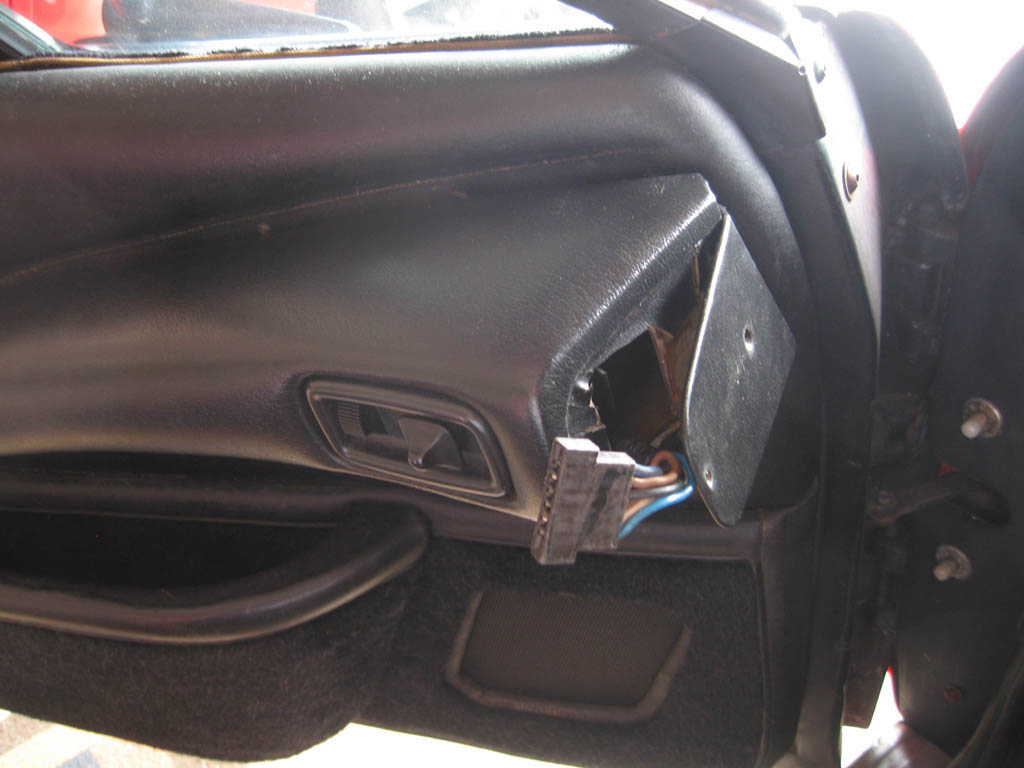
The red circles indicate the nuts and bolts that are holding the armrest (#21). Carefully remove it, minding the power mirror connector and any sharp edges from the exposed staples. The leather scratches very easily.
Unscrew the lock pin (#57) (circled in yellow).
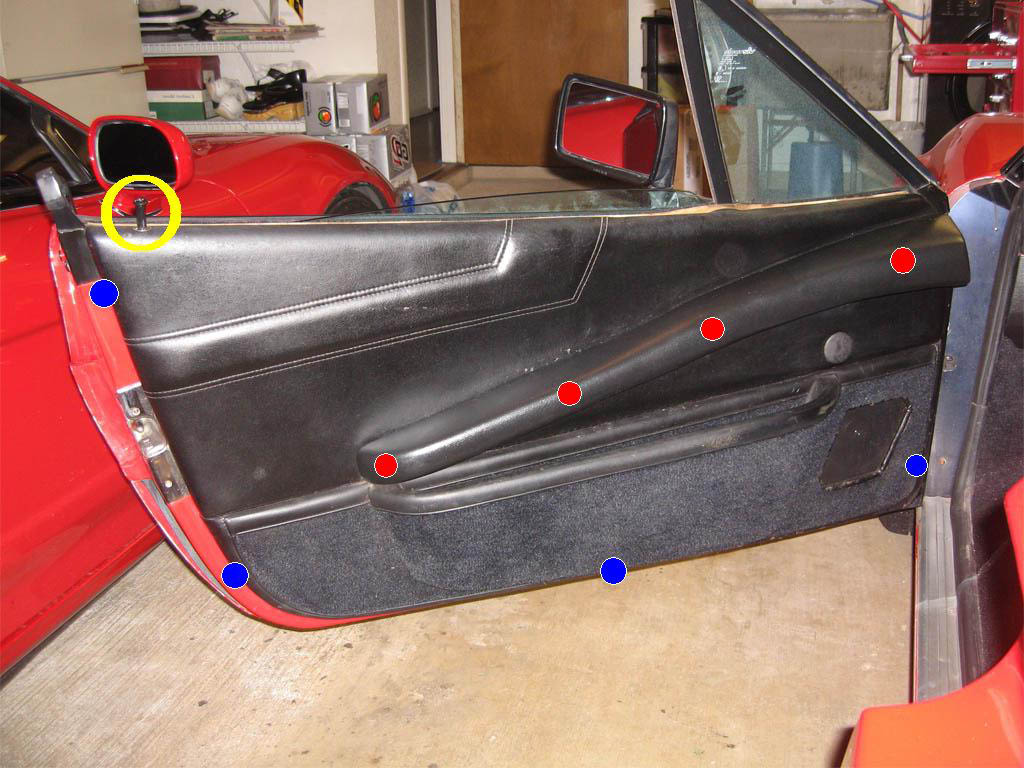
The blue circles in the photo above indicate the screws that are holding the door panel. Undo these screws. Look carefully, they may be buried in the carpet, as shown in this photo:
(click on the photo to see a larger version)
Lift the door panel to remove it.
Carefully remove the plastic door liner if it's still there.
Undo the 4 screws holding the speaker and carefully remove it. Before disconnecting the speaker wires, use a permanent ink marker to mark one side so you can reattach them correctly later. Put the speaker somewhere where the magnet won't pick up little screws and washers and drive you crazy as you look for them.
Reminder: Start with the window in the FULLY DOWN position.
Cut the old steel cable at the tensioner. (This allows you to move the window up and down freely.)

The window is connected to the cable by a pair of 10mm nuts that pinch the cable. Loosening these nuts will free the cable and disconnect the window.
For the rear connection (the one closest to the back of the car), you may need a very narrow wrench or pliers to hold the back (outside) nut in place while you loosen the front (inside) one.
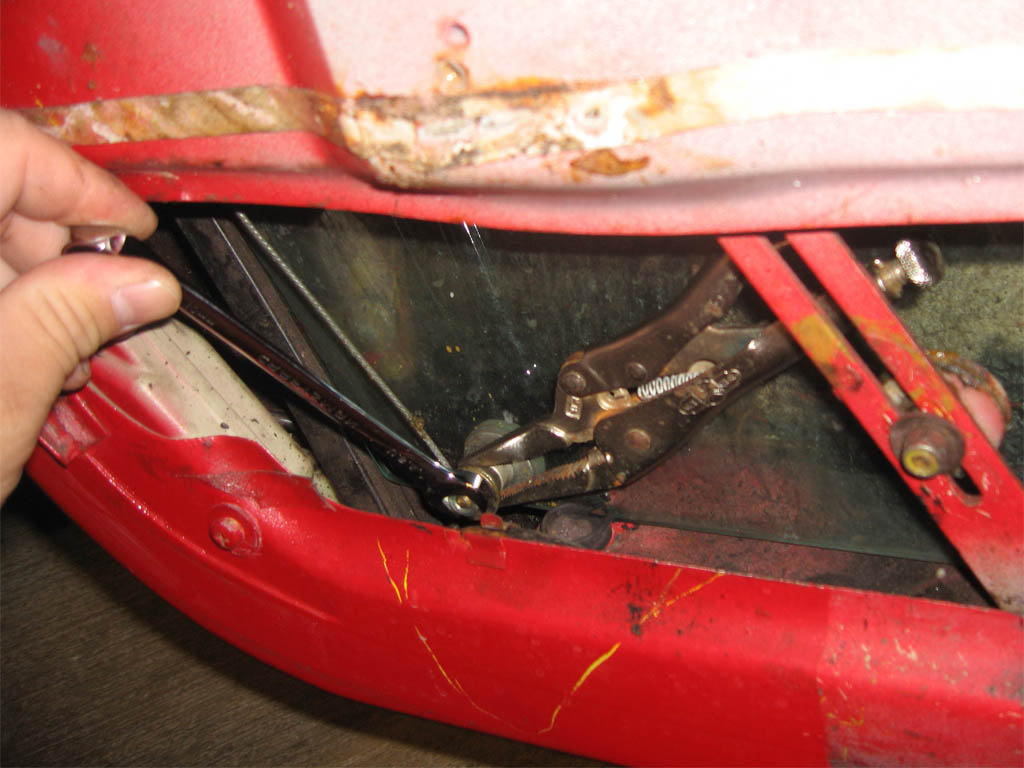
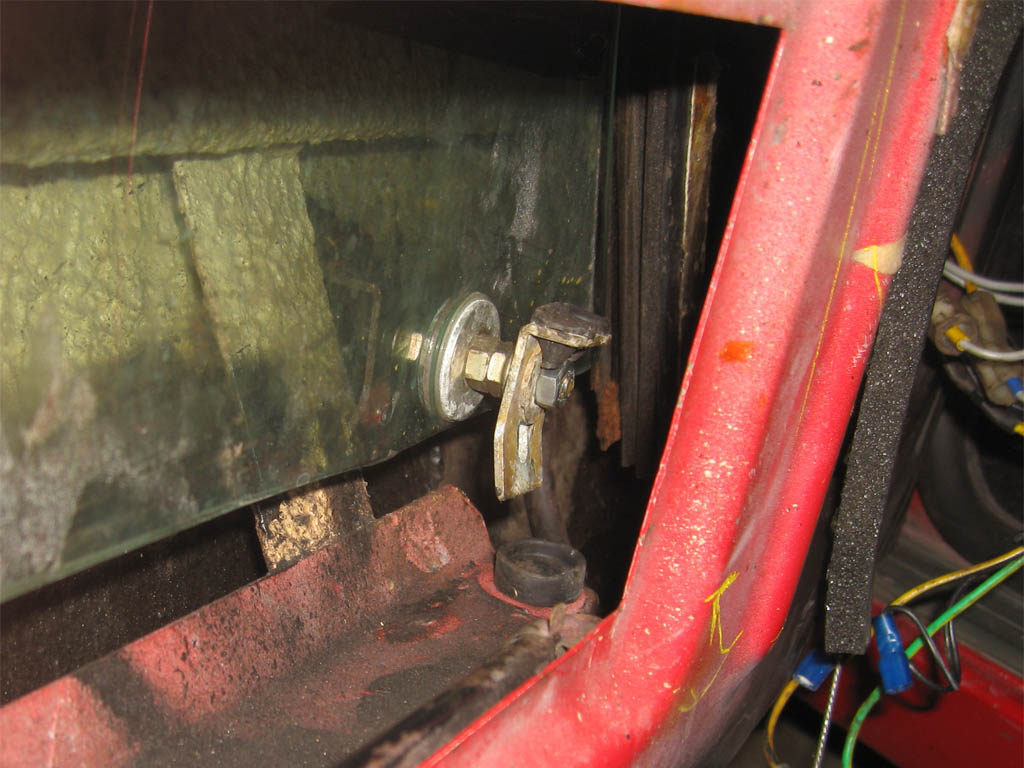
For the front connection, lift the window up a little so you can get to the fastener. The front window connection doubles as a window stop. (The cable has already been detached in this photo.)
Once the window is completely disconnected, use the power window switch in the center console to roll the window down. It's important to be sure the drive mechanism has been fully wound to one end.
The window should now move up and down freely. Hold the window in its fully up position and tape it in place. Make sure it won't fall.
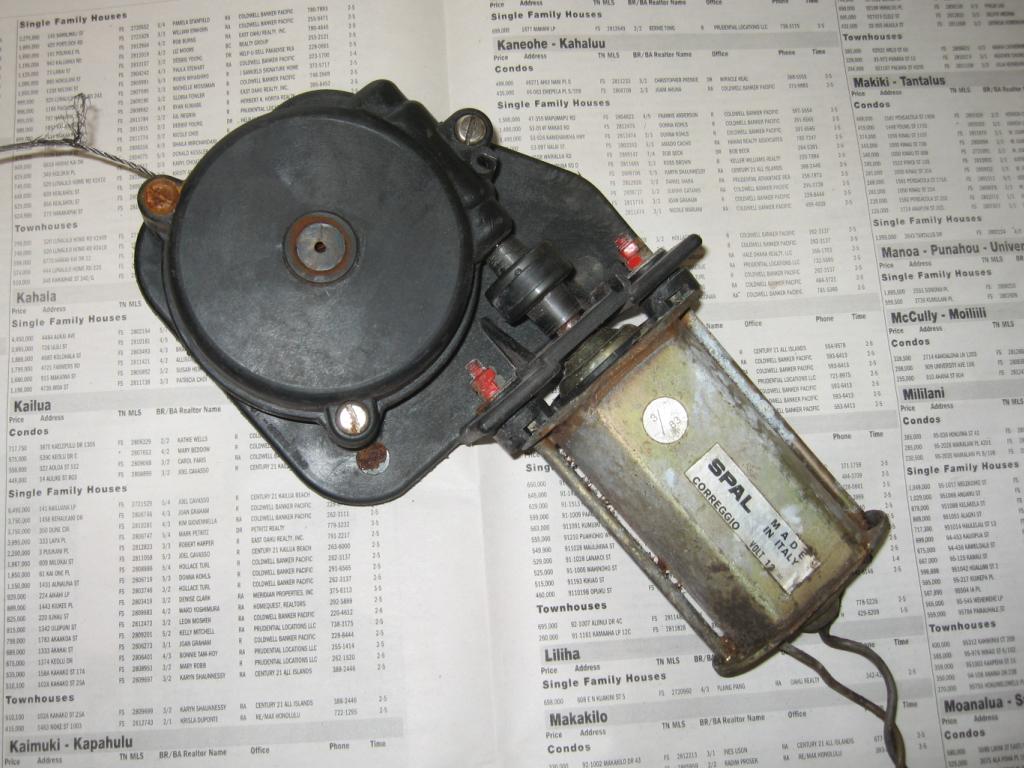
Undo the 3 8mm nuts holding the window drive mechanism (#68) in place inside the door. Stick your arm inside the speaker hole to hold the motor as you undo the nuts.
The window drive mechanism will come out through the speaker hole with a bit of twisting, rotating and finesse.
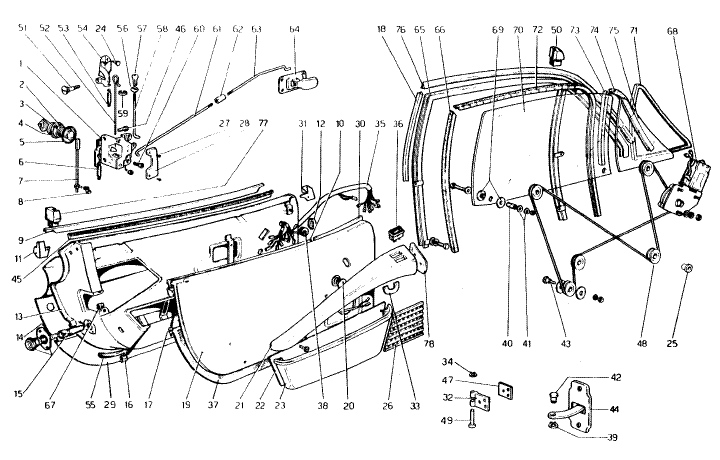
Use a permanent ink marker to mark one pair of electrical connections going to the window motor. If you put the connectors back the wrong way, the window will open when you want it to close (and vice versa). Undo the electrical connections going to the motor. As long as you don't touch the power window controls, you don't have to worry about shorting the circuit out. After the motor is disconnected, cover any bare contacts with electrical tape just to be safe.
Cut the old steel cable off as close to the spool as possible so it doesn't get in your way.
Note: The left and right window drive mechanisms are identical. They are not mirror images of each other.
Undo the 3 screws and remove the gear cover. It seems someone had done mine before because it was already pretty clean.

The rest of the pictures of the disassembly were taken after I was done cleaning everything. This makes everything easier to see and gives you an idea of what it should look like when it's clean.
Remove the worm gear and its 2 bearings. The coupler it's connected to has a flexible rubber middle, so you can bend the worm gear away from the circular gear to clear it.

The gear and spool will come out with some wiggling. Mind the 2 slightly-bent washers. I will refer to this gear-and-spool component simply as the "spool". There is supposed to be a way to take it apart further, but I never did.

Remove the metal plate. (My driver-side metal plate had this cut in it. The passenger-side plate did not.)

Remove the plastic and rubber coupler thing (I don't know what it's called.) It slides right off.
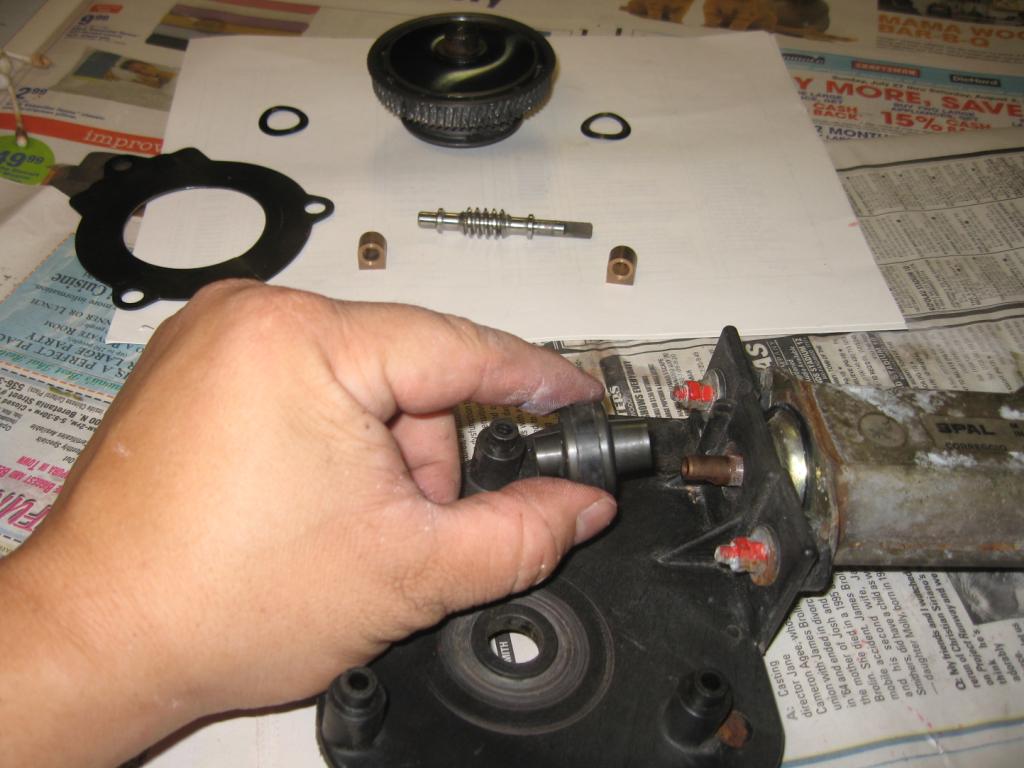
This is what the window drive mechanism looks like fully disassembled for our purposes. Every component laid out behind the motor needs to be thoroughly cleaned.

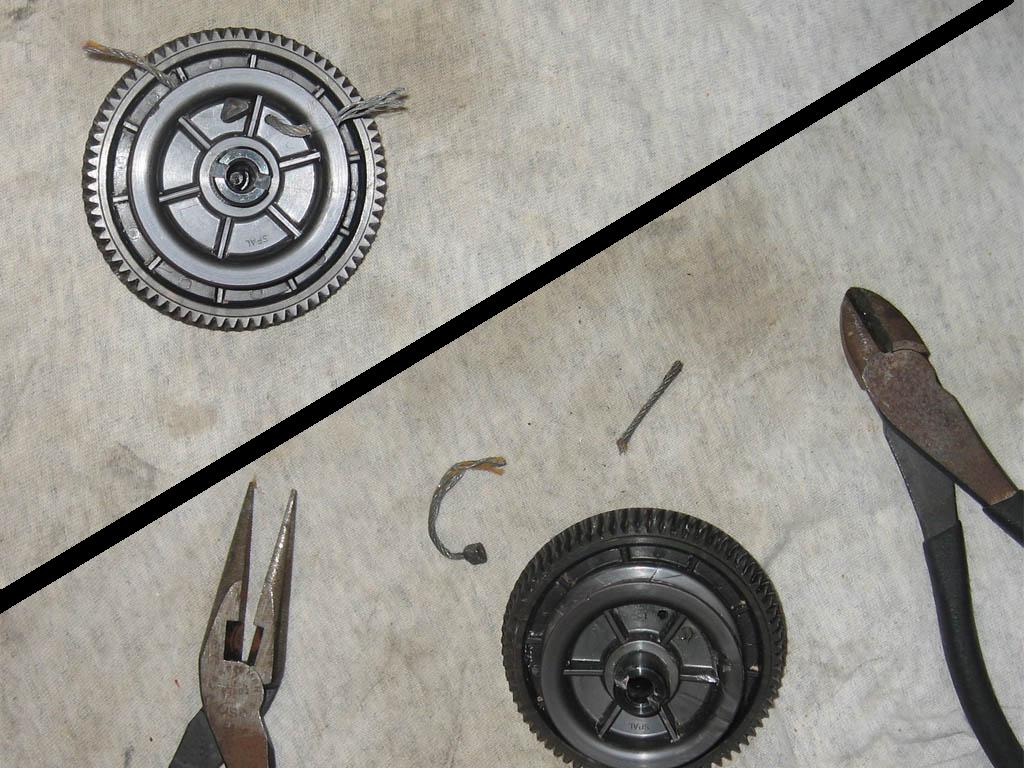
One end of the cable is terminated by a small plastic triangular ferrule. When it's time to reattach the new cable, I will refer to this end as the "left" side of the cable. You can just pull this end out with a needle-nose pliers. The other end of the cable disappears into the spool. Later, I will refer to this end as the "right" side of the cable. Cut this end off as close as you can to the hole it disappears into.
Soak anything that has old grease on it in a plastic-safe citrus solvent. The longer you soak it, the easier it will be to get the old grease off. Most people recommend soaking it overnight or at least for several hours. I soaked one side for an hour and the other overnight. Soaking it overnight makes it 100x easier to clean.
The citrus solvent I bought was a gel, so I spread it around on everything and soaked it all in a Ziploc bag.

Don't dilute the solvent with water.
While cleaning, I also used some brake cleaner, but be careful of any cleaners or solvents that may damage plastic.
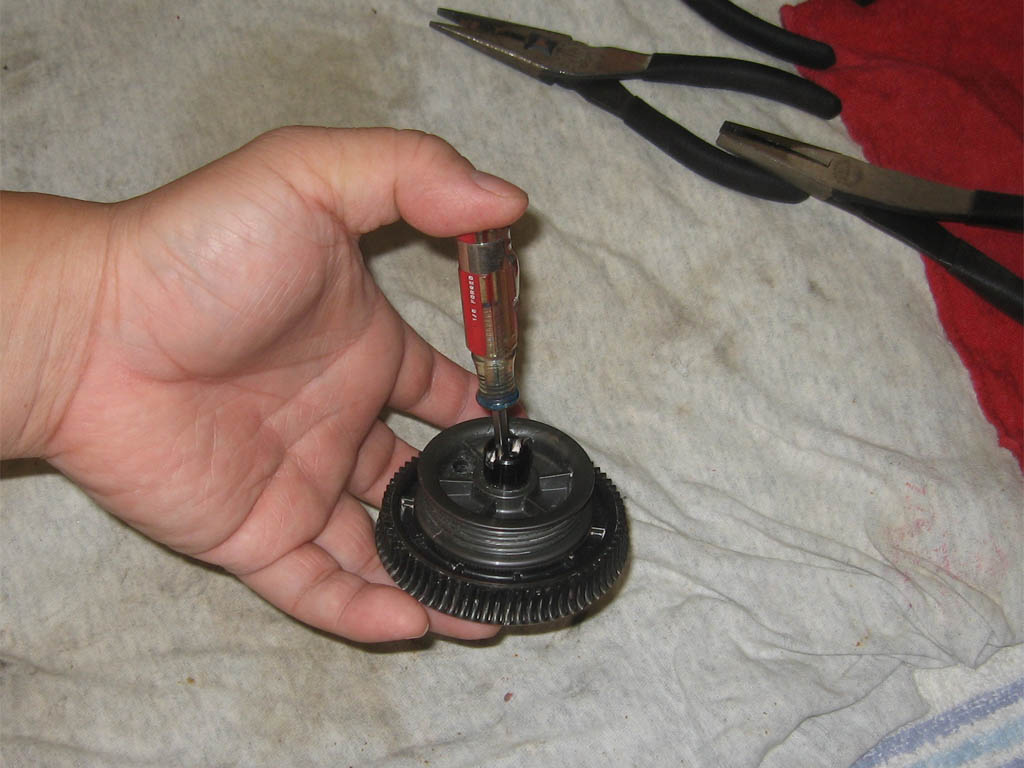
To get out any solvent that might be trapped inside the spool, insert something like a small screwdriver into the hole in the center of the spool side of the component. Push down on the internal spring and it will eject any solvent out through the hole on the other side.
After you're done cleaning everything, it should look like my components in the photos above.
Earlier, when explaining how to disconnect the old cable, I described the "left" and "right" sides of the cable.
Do the left side first since it's more difficult. There's a little hole where that end of the cable came out. Drill that hole out with a 1/4" drill bit.

Insert one end of the cable through the hole on the spool and fish it out through the hole you just drilled out. I took a paperclip and bent a hook into one end with needle-nose pliers. I used this and the needle-nose pliers to get the cable through the holes. Crimp on a stop ferrule. Be sure to crimp it on strong enough that the cable won't break free.
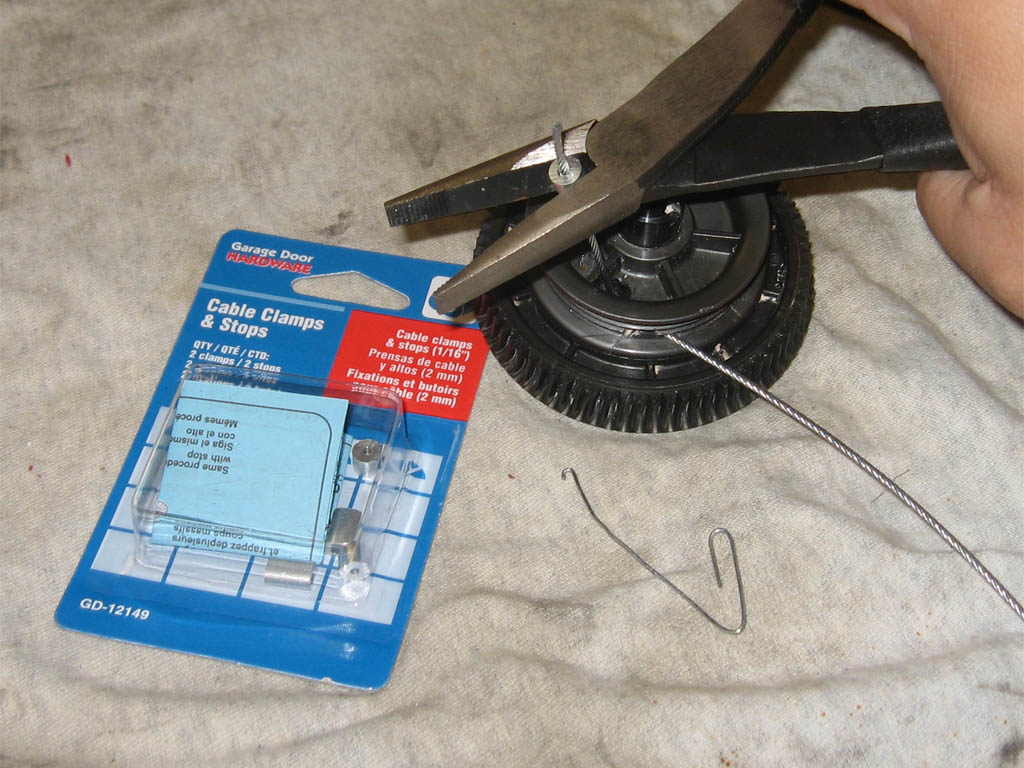
Use a file or tiny sander to get rid of the bit of steel cable poking out through the ferrule. I was worried about the edges of the ferrule scratching up the plastic plate next to it, so I alsosmoothed out the edges I used a Dremel.

I went through some incredibly tedious trial and error to get the length of the cable right. It needs to be 10' 10" (ten feet and ten inches) long from ferrule to ferrule. (NOTE: this is for the GTB/GTS. According to fchat's Dr Kananga, the GT4 length is 10' 4"). Make it as close to this length as possible since there isn't much leeway. Mark the exact length off with the permanent ink marker.
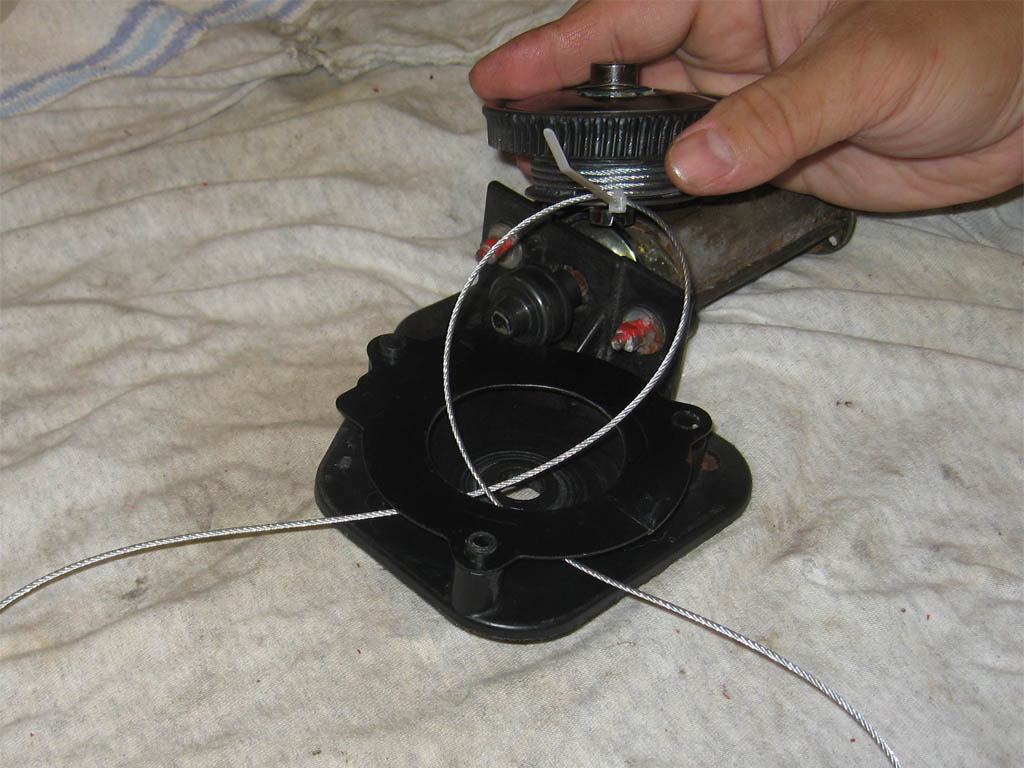
Fish the right side of the cable through the other hole on the spool and terminate it with a stop ferrule precisely at the 10' 10" (or 10' 4" on a GT4) mark. Sand it down like you did the other side.
If you examine the spool carefully, it will be evident which way the cable should be wound on it. Wind the cable on the spool tightly from one end, making sure EVERY groove is used. Once you have the cable wound on the spool, use a zip tie to hold it in place. This will make the spool much easier to handle.

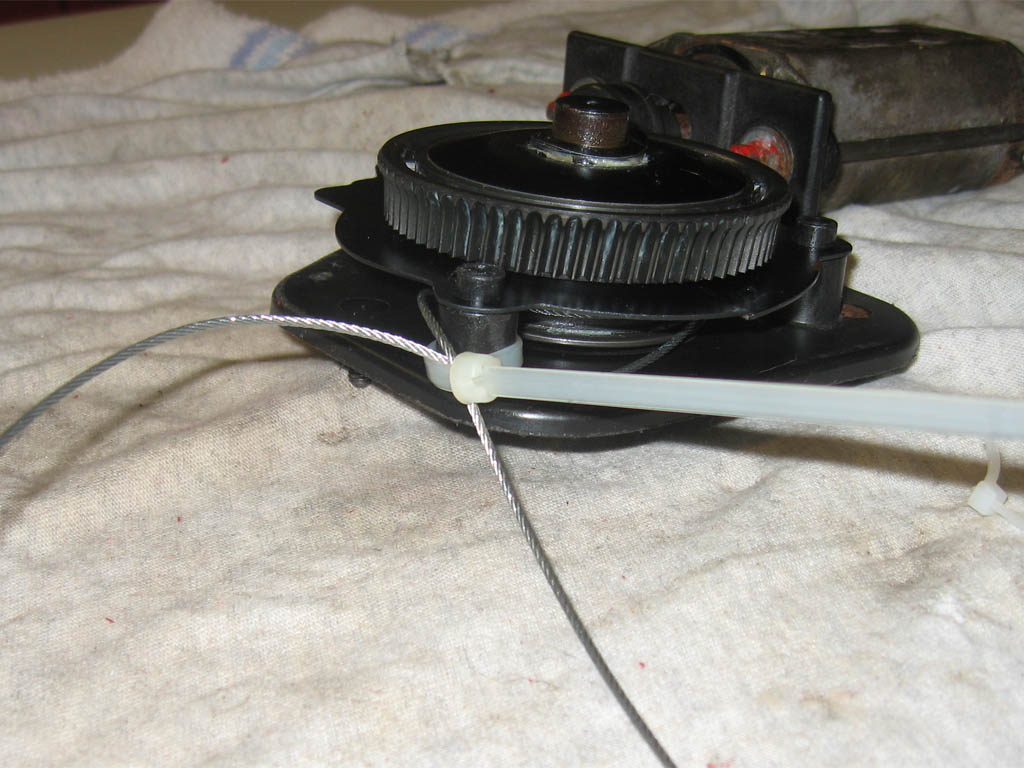
Reassembly of the window drive mechanism is a little trickier than just the reverse of its disassembly. When putting the mechanism back together, keep in mind that when it's back in the door, the cables will exit the mechanism like this:

Note the positions of the cable in relation to the gear cover supports (in red), especially the support I've highlighted with the white circle. The cable needs to "straddle" this support.
Because of the way the cable is zip tied to maintain tension on the spool, they will have to cross when going back into the mechanism. This is so the cable will be properly routed when the zip tie is cut. Don't forget the bent washer at the bottom of the spool and a dab of lithium grease. Be sure the cables are crossing like they are in this photo when you put the spool back.
It's also very important that the cables are crossing the correct way. If they're crossing the wrong way, one cable will be looped around the other when you cut the zip tie.
Once the spool is back, you can reassemble the rest of the mechanism. The rest of it is very straightforward. Be sure to drown the gears in white lithium grease. Don't use wheel bearing grease or anything else that would eat away at the plastic.
The small zip tie is too difficult to reach when the window drive mechanism is back in the door, so cut it now (careful not to cut the cable!!!) and re-zip the cable to one of the gear cover mounts as in this photo.
You will probably have to retension the cable on the spool, but this isn't too hard if you make the zip tie tight enough. This will maintain tension on the spool while you put the mechanism back into the door. Keep in mind that you won't be able to see this zip tie when you have to cut it.
The window accelerator has 3 wires: 2 leads and a ground. One at a time, cut the wires going to the window drive motor and attach a connector. Terminate the window accelerator leads with the corresponding opposite-gender connectors. It doesn't matter which drive motor wire you connect to each window accelerator lead.

Use a large zip tie to fasten the window accelerator to the drive motor like I've done in this photo. Notice that the window accelerator isn't entirely over the motor; it's halfway over the gear mechanism. If you don't position the acclerator like this, the assembly won't fit back in its original spot. Connect the leads and cover with electrical tape to ensure water doesn't get into it. The ground wire should go around one of the studs that mount the motor drive mechanism to the door.

There needs to be a good chassis ground for the window accelerator. Using a small screwdriver with your hand up inside the speaker hole, scrape off the coating on the inside of the door around the hole where the window accelerator's ground wire will be. You won't be able to see it, but there needs to be bare metal there so that the window accelerator can be properly grounded. In order to protect against rust, coat the bare metal you just exposed with some lithium grease.
Wiggle the drive mechanism back into the door through the speaker hole. It will be a little trickier because of the added size of the window accelerator, but it should be able to eventually go back to its original spot. Reattach it with the 3 8mm nuts. Reconnect the motor wires, noting the marks you made earlier to reconnect them the correct way. If you connect these wires the wrong way, the window will go up when you want it to go down and vice versa.
First, loosen the tensioner. To do this, I held a dime in my locking needle-nose pliers and used it as a screwdriver to hold the back of the tensioner while I loosened the 10mm nut in front.
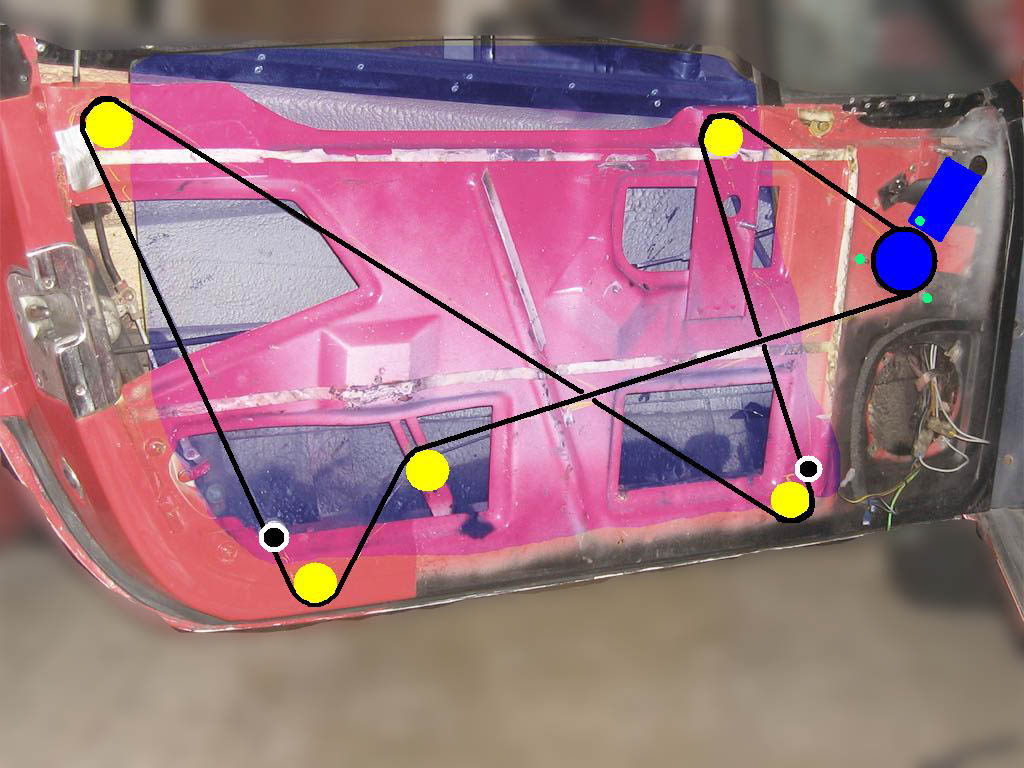
This is an illustration of the path the cable takes around the pulleys and tensioner.
Reach in with your wire cutters and cut the zip tie holding the cable on the spool. (Make sure you don't cut the cable!!!) The cable will lose all its tension around the spool, but this didn't prove to be a problem for me.
Feel around for the end of the cable that's coming out of the top of the spool and fish it around the top front pulley. It's a little tricky because the screw to attach the cable to the window sort of gets in the way. Follow the cable and fish it down around the bottom front pulley.
Be sure the rest of the cable is in "front" -- closer to the inside of the car -- than the cable that's running between the two pulleys. If you have this strung the wrong way, the window will not go all the way down because it will get caught on your crossed cables.
String the cable around the top rear pulley, again making sure you're not crossing the cables in a way that will prevent the window from moving all the way down. String the cable around the last (bottom rear) pulley. String the cable around the tensioner, take the slack out of the cable, and lock the tensioner in place.
The cable doesn't have to be very taut, but it should be taut enough that it won't jump out of any of the pulleys.
Test your cable by using the center console switch to open and close the window. (I think this also rewinds the cable back on to the spool properly.) The window isn't going to move, obviously, but check your pulleys to make sure the cable doesn't jump out. You may want to run the engine while you test the power windows so your testing doesn't drain your battery. My battery was too weak to start the car after I finished the first door.
Undo the tape holding the window up and gently lower the window in its fully down position. The window should move up and down freely. If it doesn't, loosen the 10mm bolts holding the window rails and adjust the rails so the window doesn't bind anywhere.
Press "down" on the window switch until the motor stops. Come back up a little (about an inch). Mark the cable at both points where it should attach to the window.
Use the window switch to raise the window a few inches. Attach the cable at the rear of the window. You need to support the window so it's at the right height where it corresponds with the mark you made on the cable. I used two deep sockets to hold the window up. You need to do this while the window is elevated so you can reach behind it with a 10mm wrench to hold the bolt back there while you pinch the cable with the 10mm nut in front.
With one hand holding the top-front of the glass and pulling up on it, use the other hand to raise the window to just shy of its fully open position. You should see the front cable connection through one of the holds in the door. Attach the front of the window making sure the window stop is properly aligned. It didn't seem to matter how far up or down the stop was, but it does need to be oriented correctly.
Spray the insides of the window rails with dry lubricant.
Test the window by opening and closing it several times. Be sure it's level when it goes up and down, and when it's fully up (closed), it forms a weathertight seal with the rest of the doorway. Check the pulleys and make sure the cable won't jump out, especially when the window is all the way up or all the way down. Make any necessary adjustments.
Again, make sure all your testing doesn't drain your battery.
Reattaching the door panels and armrest is simply the reverse order of taking them off. It's very straightforward but a little frustrating. It took me a lot of adjusting to get everything to line up correctly. I found that holding the locking pin shaft (#58) with an 8mm open-ended wrench while aligning the door panel really helps.
Don't forget the liner and speaker.
Once you've gotten the door panel on, you're done! Congratulations!
I found this thread from the FerrariChat archives the most informative. This thread and this one were also particularly useful, but there are dozens of related FerrariChat discussions that have useful information.
Ricambi America also had the installation instructions for their window accelerators on their website.
If you want to contact me, send me a private message at F-Chat.
[ TOP | INTRO | TOOLS | PARTS | DIAGRAM | PROCEDURE | CREDITS ]