|
SETTING THE CARBURETOR FLOAT
HEIGHTS IN A FERRARI 308
By The Birdman
This is easy and can be done by anyone in about
3-4 hours, including removing the airbox.
WHY DO IT?
The floats in your carbs are very simple devices. They are
just like the float/valve in a toilet that shuts the water
off when the level is high enough. In the toilet, if your
float valve didn't eventually shut off the water, the level
would rise until it overflowed onto the floor. Likewise, if
the float shut the water off too soon, it wouldn't be high
enough for a proper flush and nobody wants that!
The float/float valve in the carburettor does the same
thing. It controls the level of fuel in the float bowl. Too
much or too little and the car will not run right because
fuel will not flow as designed.
Before you begin, you need a carb rebuild kit. I got mine
on eBay for about $60 (enough to rebuild all 4 carbs). You
don't actually need the entire rebuild kit, but you do want
to replace the gaskets under the carb tops before you put
them together. While you have the tops off, you might as
well replace the float valves too. Both of these items come
in the rebuild kit.
The first step is to remove the airbox so you are looking
down on all 4 carbs. This has been covered elsewhere,
so I don't think you need a run down on this. (Basics:
Remove the filter element, unscrew the (16) 8mm nuts, pull
the trumpets off, and then remove the airbox, being careful
to unhook the breather hose on the underside).
Now you are looking at 4 beautiul Webers in all their
glory. If they look like mine, they are dirty. If they are
clean, you need to drive your car more.
|
|
|
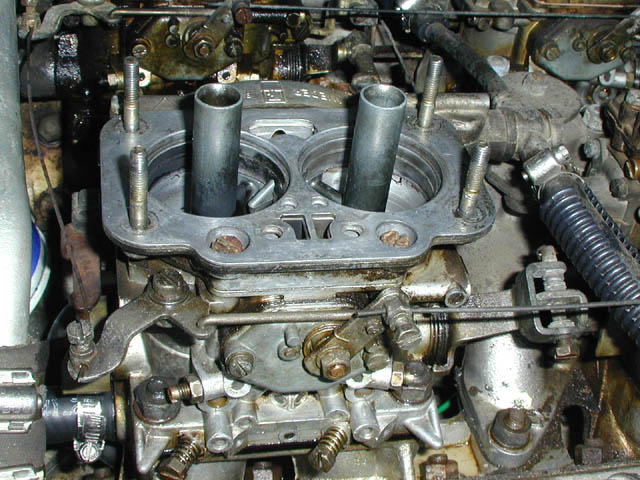
Here is your typical dirty carb with the airbox
removed.
|
|

|
|
Next, here is a shot of the 5 screws you need to
remove. What you are about to do is remove the top
of the carb. The top comes off, complete with the
float assembly. It does not require that you mess
at all with the linkages connecting all the carbs.
Nothing will get messed up doing this.
First remove the fuel lines to this particular
carb.
Next, take out the 5 screws.
Finally, just lift the top off. Be gentle with
the float.
|
|

|
|
Here is what the carb top looks like. The float
is hanging down from a pivot.
|
|
|
|
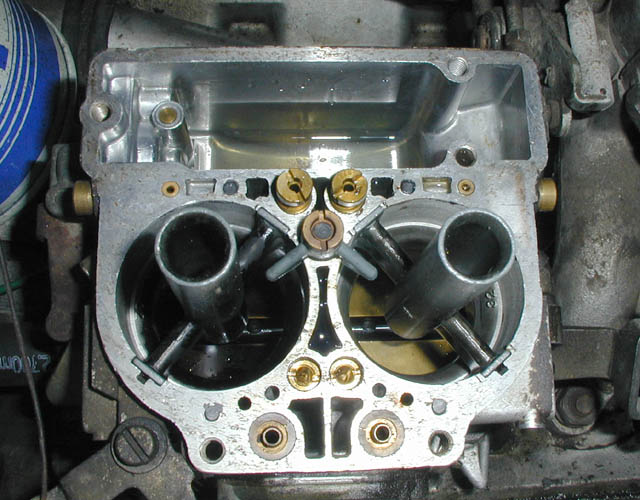
Looking down into the carb (gasket removed) you
can see the two throats (note that the left one is
discolored from the engine "coughing" back through
the carb...a common sign of running lean).
At the back, you can see the reservoir of fuel
controlled by the float height.
|
|
|
|
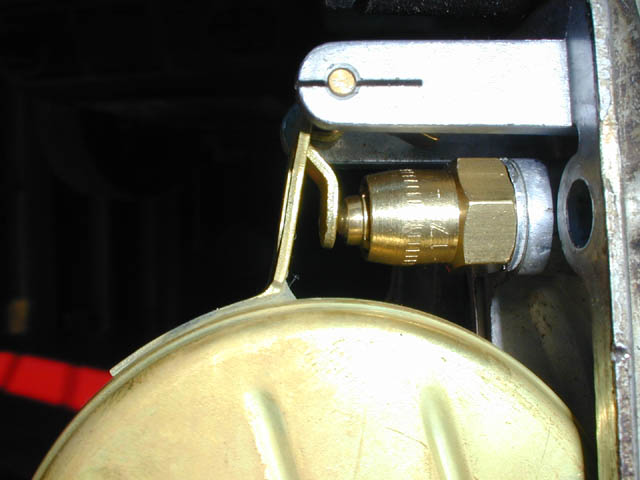
Here is a close up of the float valve. What you
have is a little plunger with a cone-shaped point
resting in a seat. The seat is the part with the
hex head on it. The plunger is the part with the
round top being pushed on by the tab on the
float.
If you wish to replace the valve, you need to
remove the float. Just push the pin that holds the
float out. (In this picture, you would push the pin
out away from you). Once the float is free, you can
shake it to be sure that is hasn't leaked and
allowed fuel inside. If it has, it's toast and must
be repaired or replaced. Next, use a 10 mm box end
wrench to unscrew the valve seat and replace with a
new one, plus a new sealing crush washer. The
washer is important to not only seal it but provide
the right clearances, so you need it.
Once it's back together you can adjust the
height. (next step)
|
|
|
|
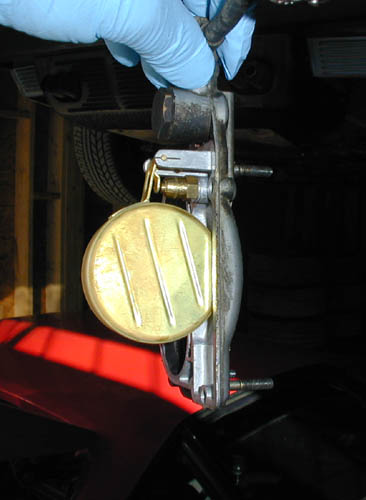
To measure the float height, you must hold it
vertically as shown, so that the float tab is
resting LIGHTLY against the plunger of the valve.
You will see that when you hold it vertically, the
tab rests lightly, but if you hold it upside down,
for example, the weight of the float depresses the
plunger and throws the measurement off.
|
|
|
|
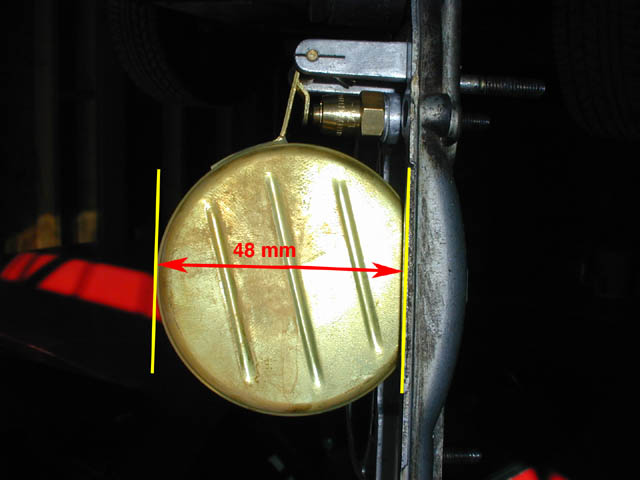
With the unit held vertically, use a clear ruler
marked in mm (available at your local stationary
supply place) to measure from the bottom of the
float to the bottom edge of the carb top, as shown.
(Much easier to use a clear ruler than an opaque
one!) Be sure to measure without the
gasket.
It should be 48 mm. If it is not 48 mm, bend the
tab that presses against the plunger until the
measurement is right. Bear in mind that minute
changes in the tab make a much larger difference in
the float height.
|
|
|
|
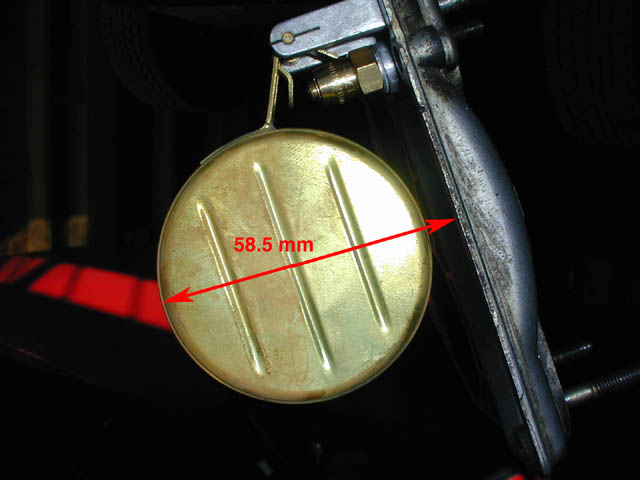
Now hold the carb top so that the float hangs
down. At this point it is resting on a second tab,
pressing against the side of the valve seat. This
tab just keeps the float from hanging too low and
hitting the bottom of the carb. This tab should be
adjusted so that the measurement is 58.5 mm. That
gives it a travel of 10.5 mm from top to bottom.
Don't ask me how they decided to use 58.5 mm
instead of a nice round number like 58, and GOOD
LUCK getting it exactly 58.5. I'm sure that
anywhere from 58 to 59 is fine.
|
That's it! Your float is now adjusted. Replace the gasket
on the carb top, and gently put the top back on the carb,
being careful not to bend the float, and screw it back down.
Now move on to the next carb.
A few helpful hints: when you remove a carb top, there
will be fuel in the passages and valve. You might want to
take it outside and give it a gentle squirt of air to blow
the fuel out so it doesn't drip all over the garage.
Wearing nitrile gloves will keep you from smelling like a
gas station attendant when you are done.
Be careful how you lay the fuel lines when you unplug
them as they will drip too. You don't need them dripping on
anything important like plug wires.
When you are finished with the entire job and have
replaced the carb tops, run the fuel pump and look down the
throats of the carbs to be sure that the valves are working
and fuel is not overflowing into the engine. That is
BAD.
Happy adjusting!
<--BACK to Main
Page
THE FINE PRINT: This service procedure is
provided as the personal experience of the author who is in
no way an expert, so take this advice with what you
paid for it. I am not liable if you blow yourself
up!
|
