
|
|
|
|
|
|
REAR BRAKE CALIPER REBUILD
1983 Ferrari 308 GTS QV US-spec
By Ken (zff on FerrariChat.com)
Originally written in Feb 2003, updated intermittently
[ INTRO | TOOLS | PARTS | DIAGRAM | PROCEDURE | CREDITS ]
One day, I noticed the rear brake caliper on the driver's side was leaking brake fluid. I pulled the wheel off to look and found it was leaking where the handbrake lever entered the caliper body. I've read this is a common problem. I rebuilt the caliper with all new seals and o-rings and documented the procedure here.
Aside from a good set of sockets, wrenches, screwdrivers, etc..., you'll need:
- Circlip pliers (squeeze type)
- Circlip pliers (expand type)
- T27-size Torx driver
- Torque wrench (~16lb-ft) and (~60lb-ft) (2 different wrenches for me)
- 4mm Hex key
- Locking needle-nose pliers
- Drill with 1/8th-inch metal bit
- Hammer and a metal dowel
- Wheel bearing grease (high temperature)
- Brake cleaner (I used 3 cans) and a small wire brush
- Brake fluid (for bleeding the system - I used about 1.5 quarts)
- Glue (any kind, but not too strong)
- Wooden chopsticks or something similar
I ordered parts online from Sodacom's (no longer in business), and over the phone from T.Rutlands. I didn't find one kit that had all the parts. Be sure you get all the items listed below. I spent about $100 (Feb 2003).
T.Rutlands part #95691537:
- 4 - o-rings for caliper halves and caliper spacers
- 1 - o-ring for inner caliper adjuster screw
- 1 - o-ring for outer caliper adjuster screw
- 1 - seal for handbrake lever shaft
- 1 - metal cap for bottom of handbrake lever shaft
Sodacom's part #95691536:
- 2 - caliper dust boots
- 2 - dust boot springs
- 2 - caliper seals
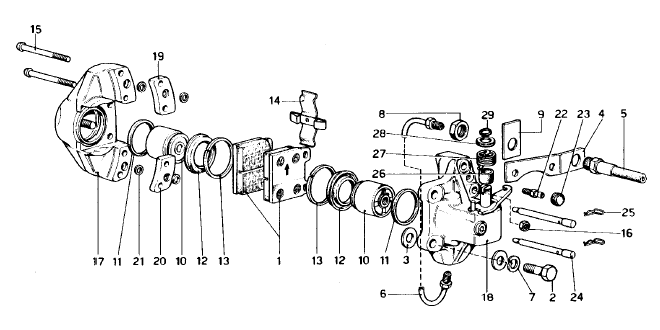
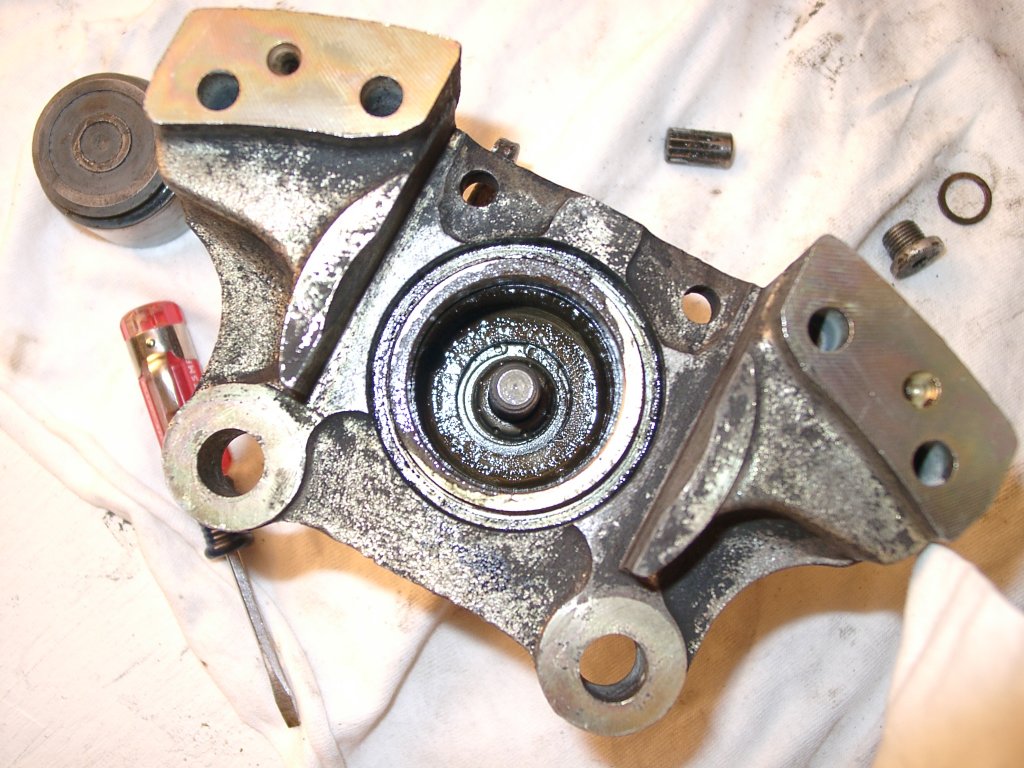
This diagram is for a 1978 308, but it's pretty close to my 1983. The only difference is the brake line bracket. I'll use the numbers in this diagram when referring to parts. The caliper halves (#17, #18) will be disassembled slightly more than in this exploded view.
- Remove the caliper - part I
- Remove the caliper - part II
- Remove metal cap
- Split the caliper
- Side Note: Cleaning
- Inner caliper - remove piston
- Inner caliper - remove adjuster screw
- Inner caliper - remove handbrake lever
- Outer caliper - remove piston and adjuster screw
- Outer caliper - reassembly
- Inner caliper - reassembly
- Rejoin caliper halves
- Replace metal cap
- Reinstall caliper
- Final steps
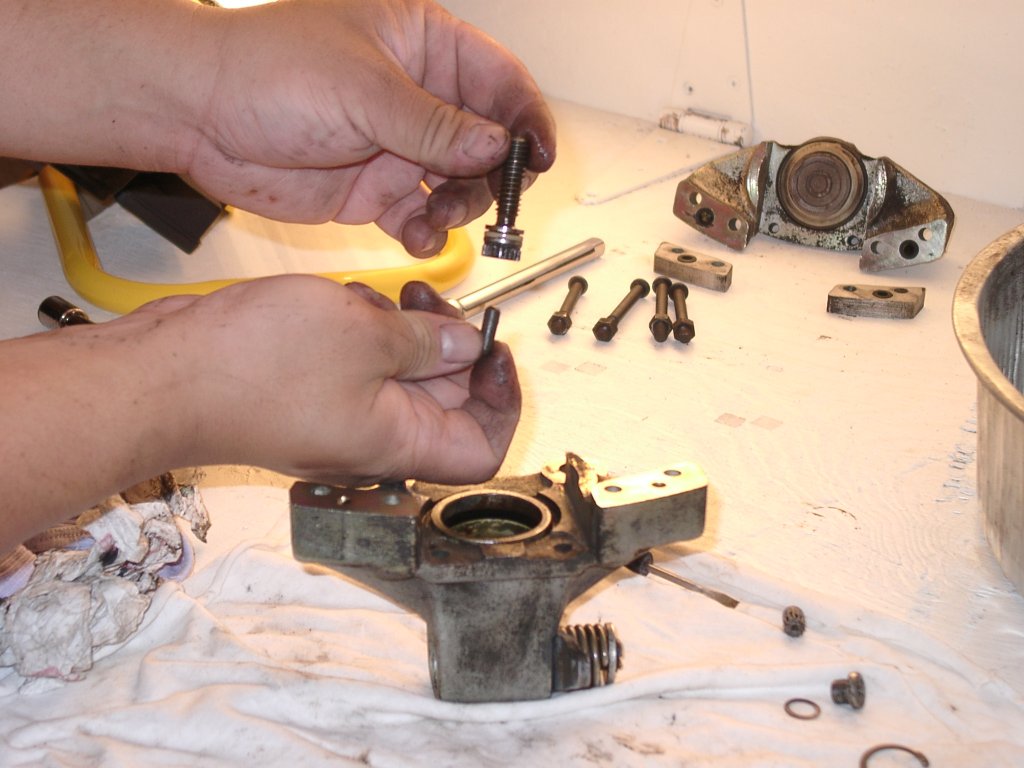
Remove the retaining clips (#25), guide pins (#24), spring (#14) and brake pads (#1). Unhook the handbrake cable from the lever. I managed to do this with a lot of pushing and pulling and no tools.
Drain the fluid from the bleed valve (#22) so it's not so messy later. You have to completely remove the metal brake line (#6) because it's blocking the caliper bolts (#2). Unscrew it from the caliper body and the flexible portion of the brake line at the bracket.
That brake line bracket sort of blocks your access to the caliper bolts. I disconnected the flexible hose from the bracket and BENT the bracket out of the way (and bent it back later). It's up to you if you want to do this too. If you decide to bend it, be sure to bend it as little as possible, and keep the part of the bracket with the hole straight. If you don't, it'll be harder to put the flexible brake line back through later.
Cover your open brake line with something to prevent moisture from entering. I wrapped mine tightly with alumninum foil.
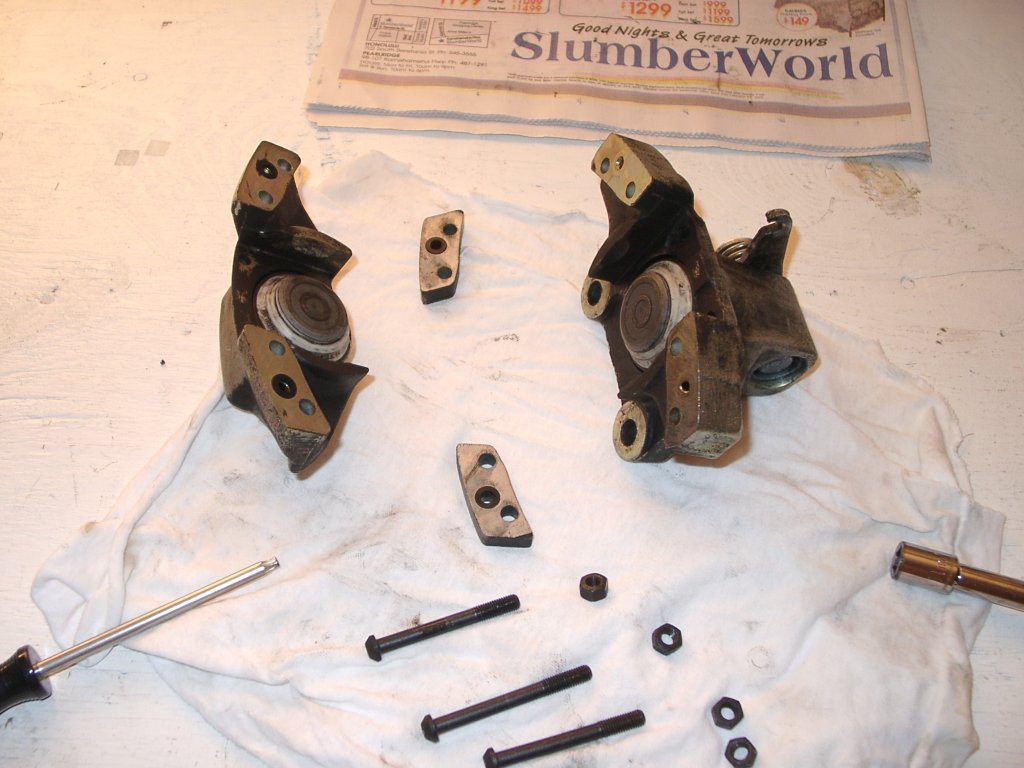
Ok, here's the catch: there are shims (#3) between the caliper and the hub at each bolt, and you have to make sure not to mix them up.
Loosen the top bolt but don't remove it, then remove the bottom bolt. Rotate the caliper up and you might see the lower shims fall. If you don't, check the mating surfaces of the caliper and hub and make sure there isn't a shim sticking somewhere. It's possible there are no shims.
Remove the top bolt and retrieve the upper shims, if there are any. Don't get the upper and lower shims mixed up because if you don't put them back the right way, your caliper won't be perfectly parallel to the rotor.
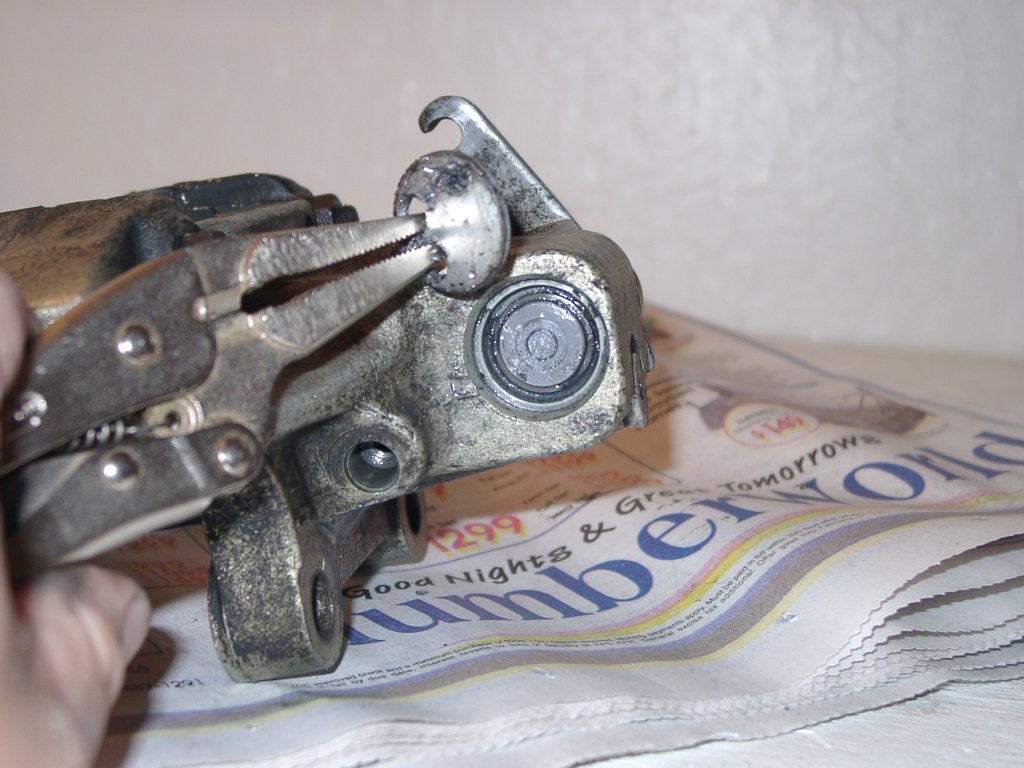
I did this first because I thought it was going to be much more difficult than it really was. There's a metal cap covering the base of the handbrake lever shaft. To remove it, drill two small holes to get your needlenose pliers in and pry it out.
Don't go crazy with the drill. You don't want to damage what's under the cap.
(click on a photo to see a larger version)

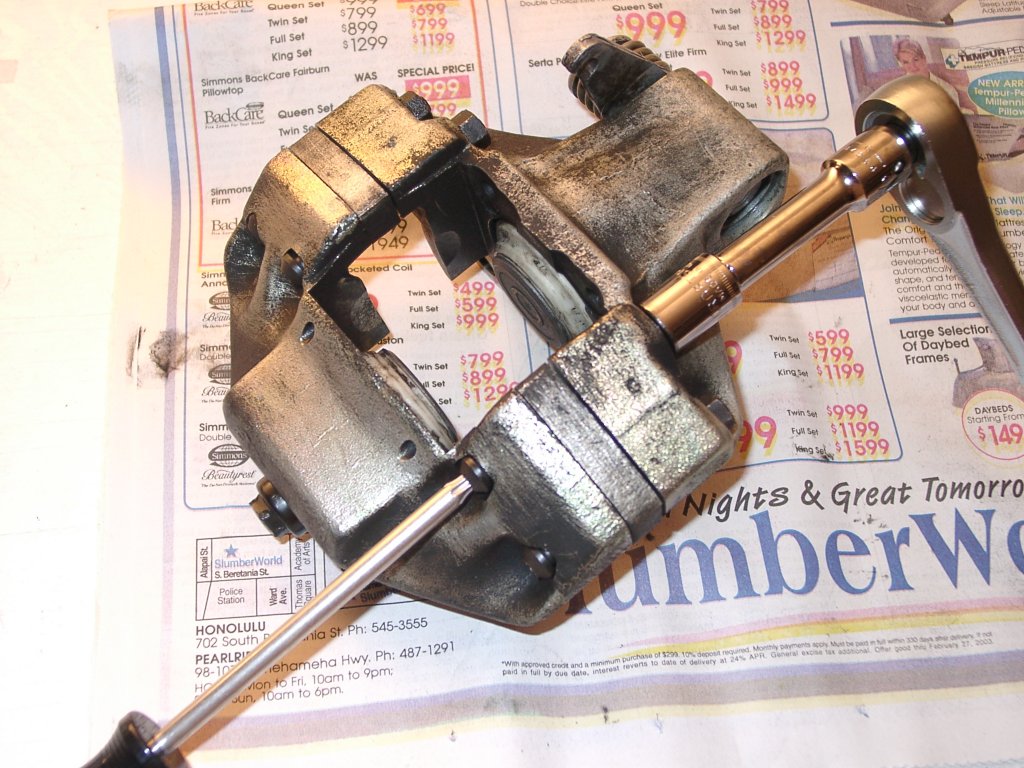
The four bolts (#15) holding the caliper are not actually Torx bolts. I've read that they're RIBE bolts, but a T27 Torx driver worked just fine for me.
My bolts were stuck pretty tight. I had to soak them overnight with a penetrating lubricant, then hold my Torx screwdriver with a crescent wrench to crack the nuts (#16) loose.
(click on a photo to see a larger version)
You'll notice that in every picture, the parts are getting cleaner and cleaner. I took my time doing this rebuild and I cleaned everything with a lot of brake cleaner and a little wire brush every step of the way. Do NOT use water. Water is the enemy of hydraulic braking systems.
Remove the dust boot (#12) and spring (#13)
Turn the caliper over and use your hex key to remove the plug that hides the adjuster screw. (This part - and all the other parts inside the calipers - isn't shown in the diagram.)
Use the same hex key to turn the adjuster screw to force the piston (#10) out.

The adjuster screw isn't going to push the piston all the way out. After a certain point, you'll have to pull it out yourself. Don't use any metal tools to do this. I was able to pull it out with just my fingers. It's a very snug fit. Be EXTRA careful not to nick or dent the piston or the inside cylinder of the caliper.
When you were turning the adjuster screw to push the piston out, you weren't actually turning the screw, you were turning a little gear that turns the screw. That little gear has to come out of the hole you stuck your hex key into. It should come out fairly easily. If you can't get it out, wait until you get the adjust screw itself out (next few steps). After that, the gear should just fall out.
You can see that gear in this photo. It's between the plug ring and the piston.
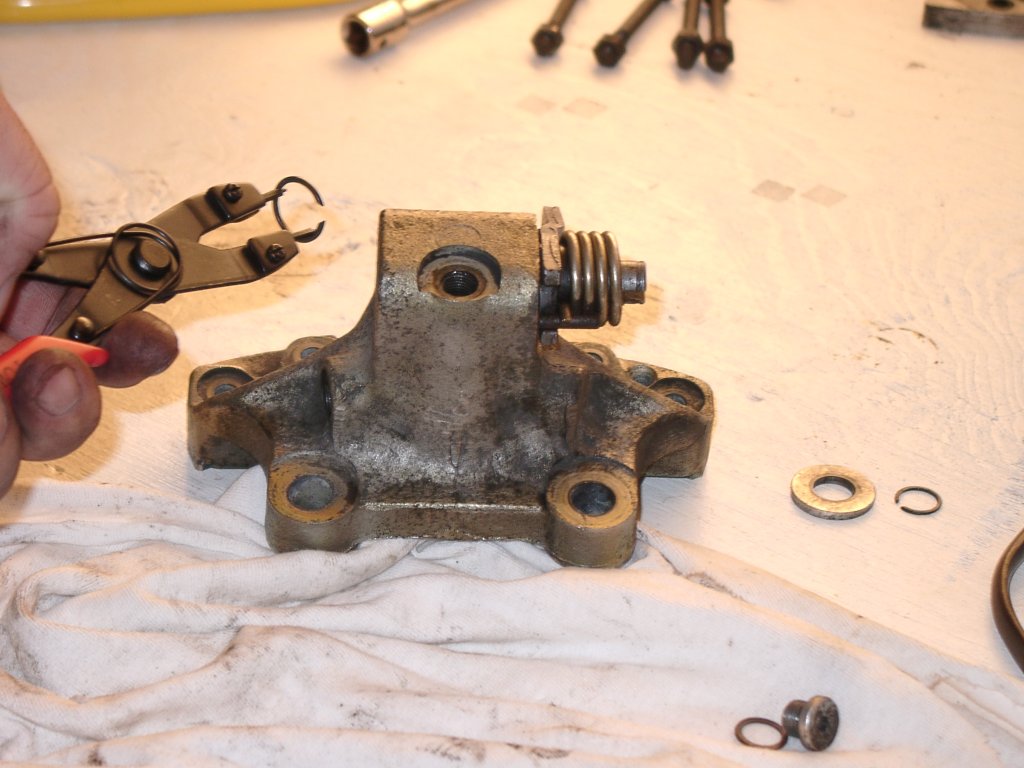
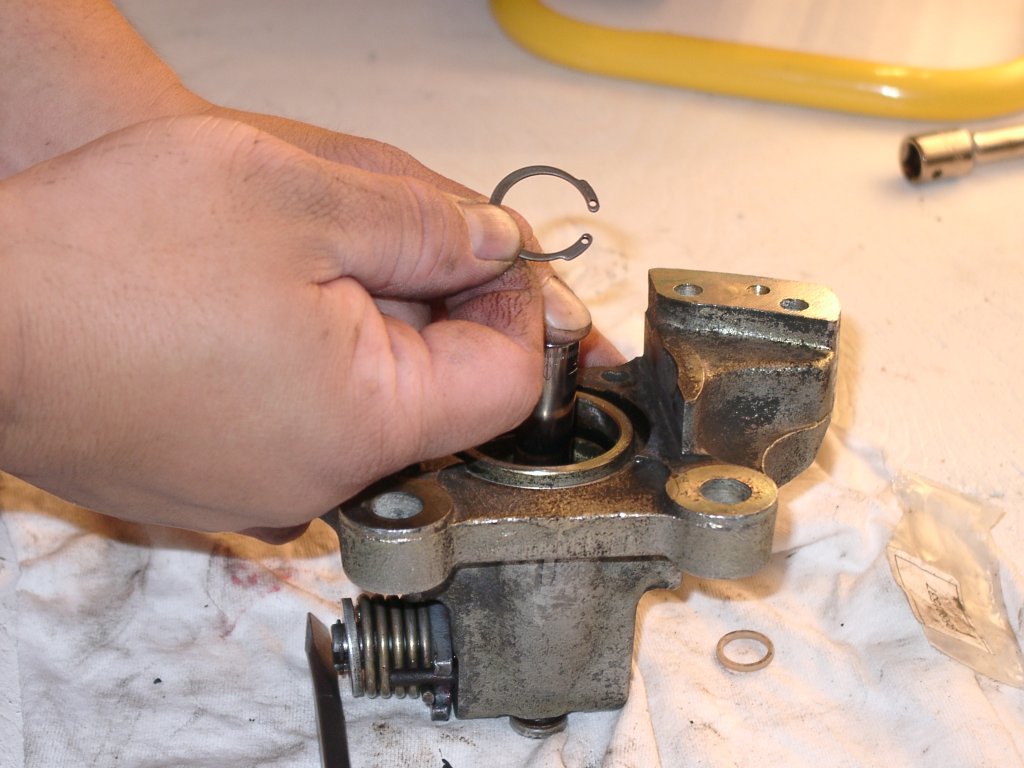
Look down into the caliper cylinder. (next photo) You'll see a circlip around the base of the adjuster screw that you need to get out. It's kinda tricky, even with the squeeze-type circlip pliers. Remember, you have to be REALLY careful not to damage the inside of that cylinder. If you do damage it and the piston can't go back in (remember it's VERY snug), you'll have to buy a new caliper.
Once you get the circlip out, you can remove the spring base thing it was holding down. (see photo)

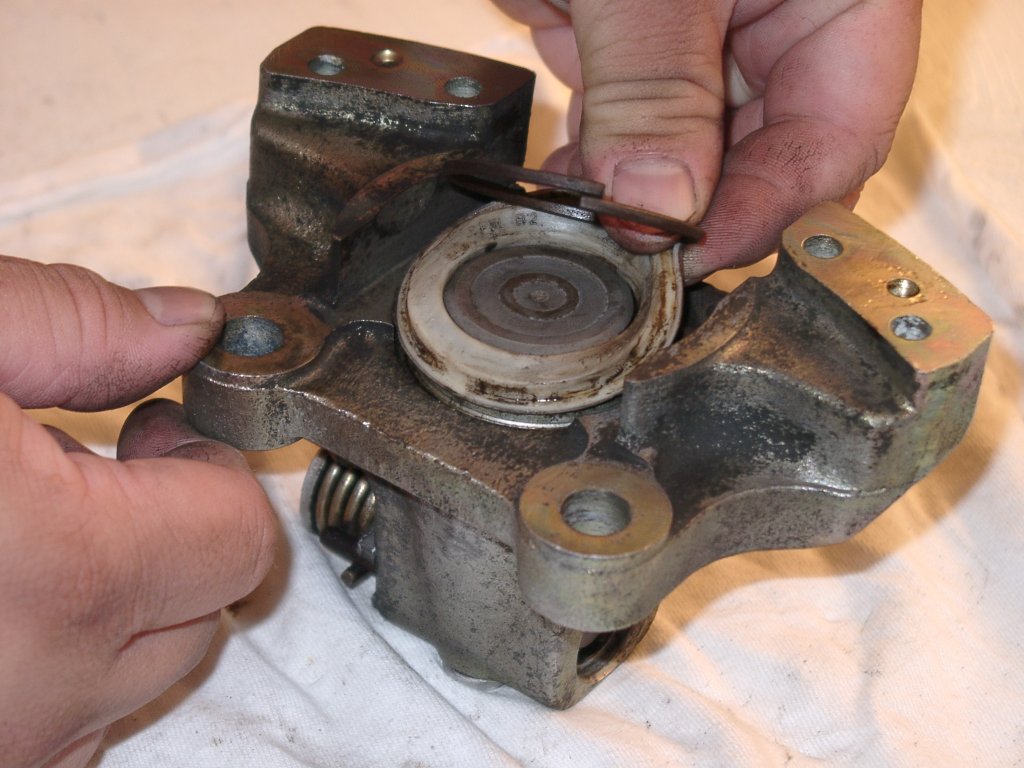
Now, removing the adjuster screw itself is easy. The bottom of the adjuster screw has a little pocket that a pill-shaped object fits into. The handbrake lever shaft also has a little pocket (that's a little off-centered) where the other end of that "pill" fits into. When you turn the shaft, it pushes that pin into the bottom of the adjuster screw which then forces the caliper out, pressing the pad against the disc. This is how the handbrake mechanism works.
There's a seal at the base of the adjuster screw that you need to replace. Take the old seal out, clean up the screw and put the new seal in. (The old seal is white in the photo.)
Also in that photo, you can see the seal (#11) inside cylinder. This seal needs to be replaced. Clean the piston out with a lot of brake cleaner and a soft rag. Be really careful when removing the old seal so you don't damage the inside of the cylinder. Coat the new seal all over with a thin film of brake fluid before you put it in place.
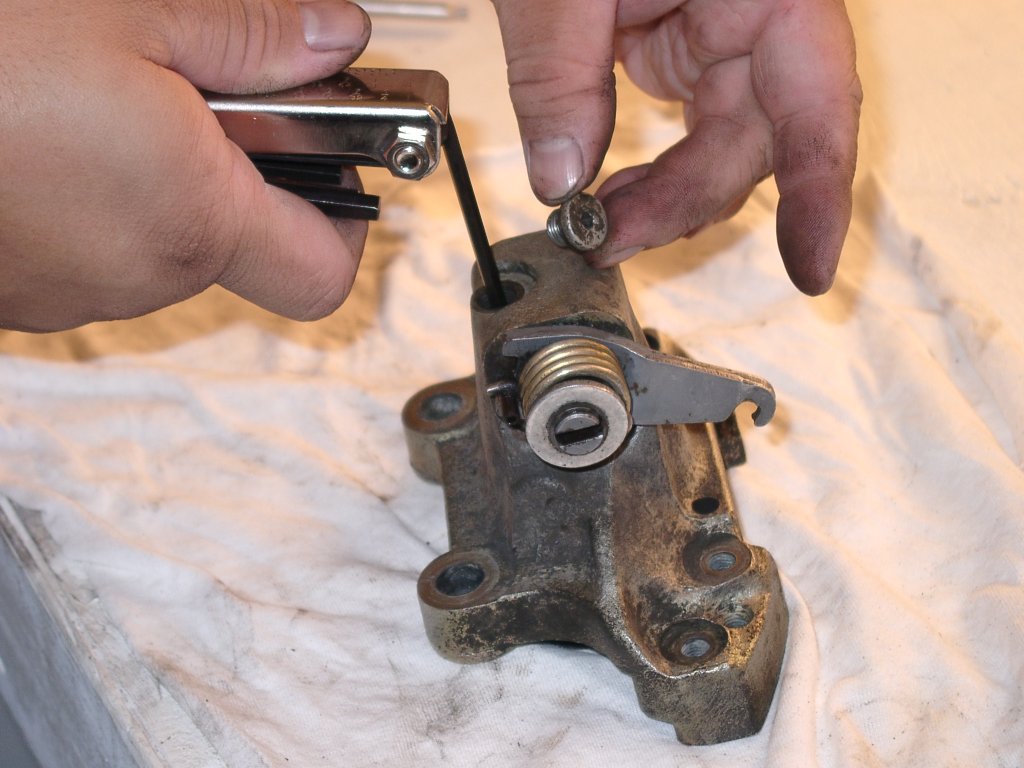
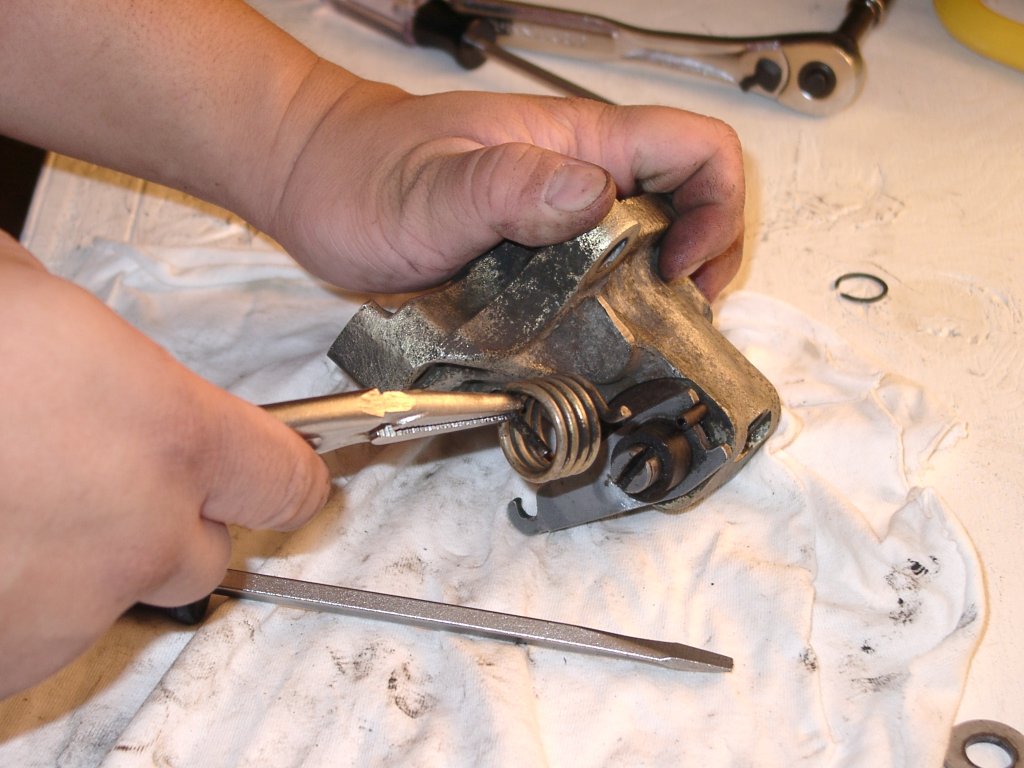
Now that you have the adjuster screw and "pill" out, you can remove the handbrake lever. First, take out that clip at the base where that metal cap used to be. You can probably do this without the expand-type circlip pliers, but it helps.
Next, remove that beefy-looking tension spring. I used my needlenose locking pliers to get a good grip on it, and I just twisted and yanked. There's less tension on the spring than I thought so it was pretty easy. I covered the whole thing with a rag when I did it so the spring wouldn't go flying, but that was probably unnecessary.
Once the spring and clip are out, the lever and shaft slide right out. There's a seal around the shaft right under the lever. This is the part that commonly fails. See how messed up mine is in the photo.

Be sure to clean everything up real nice with lots of brake cleaner.
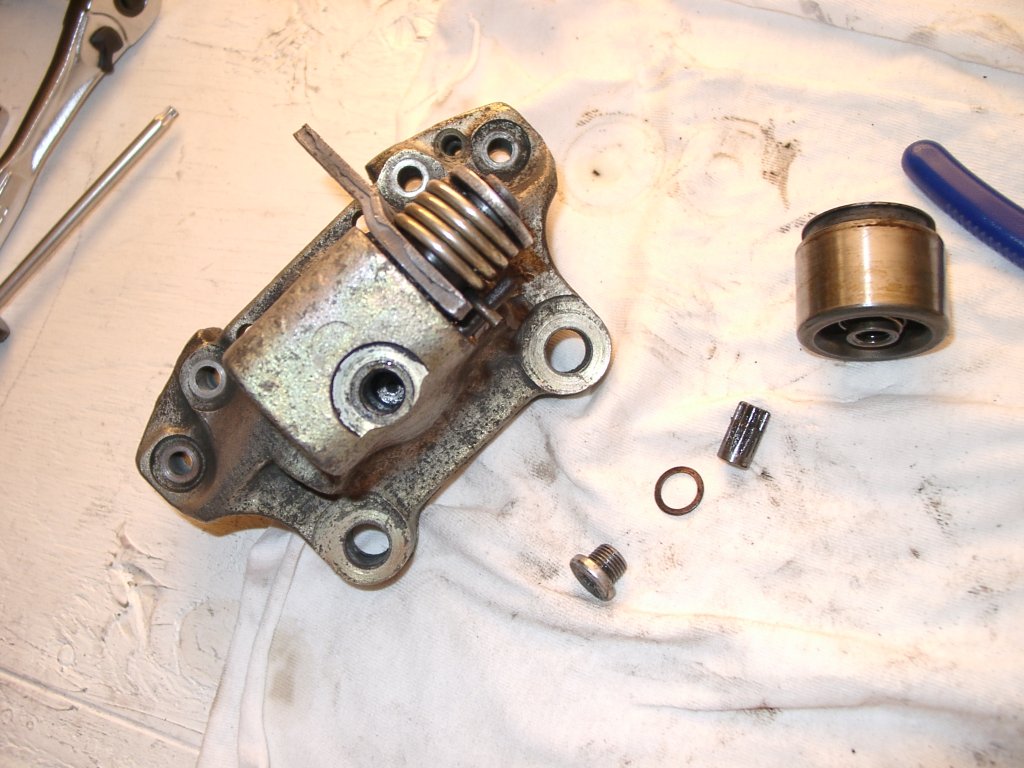
The outer caliper is a lot like the inner one, except it's simpler. You'll still have to pull off a dust boot (#12), a spring (#13), and there's a seal (#11) there.
A 4mm hex key and a 13mm combo wrench are all you need for the adjuster screw. Remove the cover (it's in my left hand in the photo) and loosen the locking nut. Again, turn the adjuster screw with your hex key to push the piston out. The same precautions about not damaging the piston or cylinder apply to this side as well.
Take out the circlip and the locking nut to remove the adjuster screw entirely. There's a tiny o-ring at the base of the adjuster screw. There's also a seal in the cylinder wall just like the other half. Be sure to clean everything up and replace the seal and o-ring. Don't forget the thin coat of brake fluid on the new piston seal.
This photo shows the outer caliper completely dissassembled.

After you've cleaned it all up and replaced the rubber parts, reassemble the outer caliper. It's just the reverse of the disassembly. The locking nut and circlip on the adjuster screw makes it a little tricky, but it's still pretty straightforward.
Be sure not to pull the pistons all the way in then try to pull it in some more. I've read that this will really screw things up. When the adjuster screw doesn't turn don't force it.
Also, don't forget to replace the o-rings (#21) for the channels that allow fluid to get from one half of the caliper to the other. Both in the outer caliper (#17) and the spacers (#20).
Reassembly is basically the reverse of disassembly and should be pretty straightforward. Be sure you clean everything and replace all the rubber parts. The handbrake lever shaft needs some wheel bearing grease on it before sliding it back in. The "pill" and area around it and the adjustment gear also need some grease during reassembly.
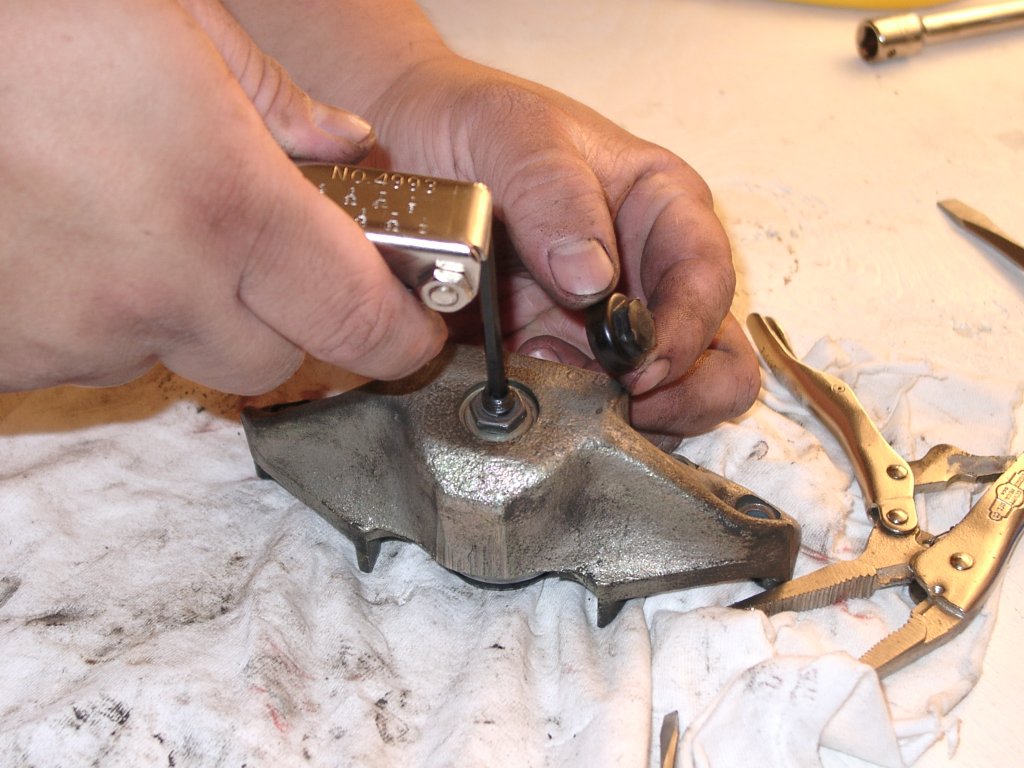
Replacing the base spring and circlip is the most difficult step in this procedure. I used a deep 10mm socket to hold the base spring down while I tried to replace the circlip. I pushed down on the clip with wooden chopsticks to be sure not to damage the cylinder walls. You can see my thumb holding down the socket in the photo.
In the end, I had to use an extra set of hands. One set holding down the base spring and the circlip pliers, the other set with the wooden chopsticks to push the clip down.
Again, be sure you clean everything and replace all the rubber parts.
Note that there are 2 different bolt lengths. The longer bolts go on the outside. Torque the inner bolts to 7lb-ft then the outer ones to 7lb-ft. Then go back and retorque the inner bolts to 16lb-ft then the other ones to 16lb-ft.
The new metal cap should be slightly curved. Put in place at the base of the handbrake lever shaft with the concave side out. Then put you metal dowel against it and hammer away until you've sort of flattened it, jamming in place for good.
Your freshly rebuilt caliper should now be ready for service!
The easiest way to reinstall the calipers with the shims in place is to glue the shims to the caliper first. I used a spray adhesive. Worked perfectly.
The caliper bolts should be torqued to 60lb-ft.
Connect the brake line, bend back the bracket, and reconnect the handbrake cable. Put the brake pads, spring, guide pins, and retaining pins back or install new ones.
Be sure to bleed your brake system at all four calipers. Bleed the caliper you worked on over and over. There are a lot of little nooks and crannies air can get trapped in, as you saw when you took the caliper apart. I ran through a quart of brake fluid just for the corner I rebuilt. I doubt I got all the air out, but I'll wait a week before bleeing it again.
Take your car out for a tentative test drive. Follow reasonable precautions and test out your brakes. When you bring your car back, check for fluid leaks. If you cleaned your caliper up real nice, any leak should be pretty easy to spot.
...and that's it!
The Porsche 914's rear calipers are similar, so I found this Pelican Parts tech article very helpful. I also got a lot of valuable info off FerrariChat.
Here is a very good video on Youtube showing the complete rebuild process.
If you want to contact me, send me a private message at F-Chat.
[ TOP | INTRO | TOOLS | PARTS | DIAGRAM | PROCEDURE | CREDITS ]