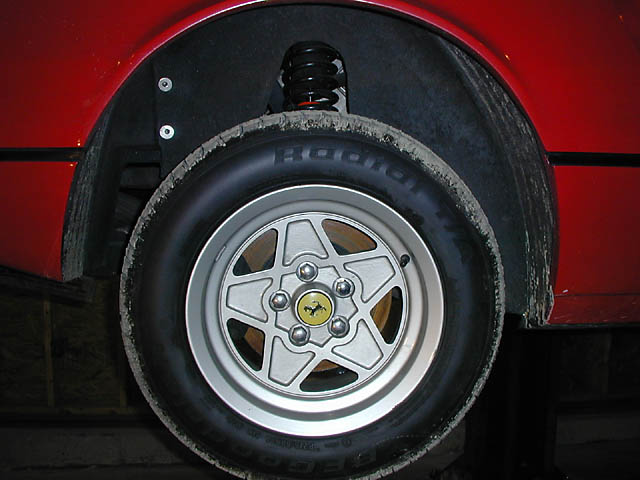
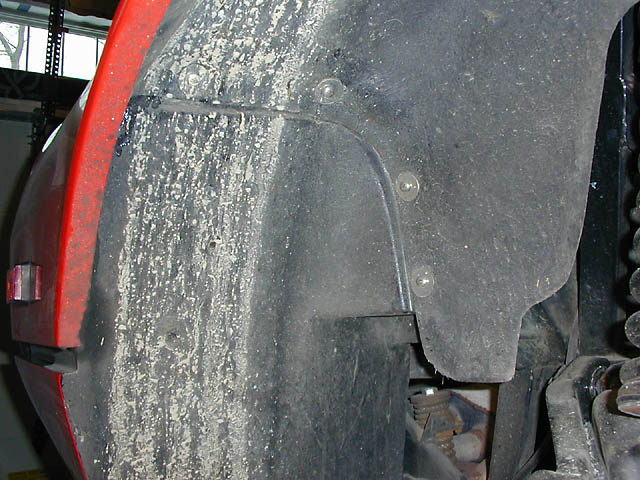
Timing Belt Change Procedure FIRST DISCLAIMER SECOND DISCLAIMER UPDATE: Although this tutorial was written a few years ago, I have added some updated info as I just changed my belts again (10/2011) and there were some new parts options and prices to report. A WORD ABOUT LIFTS Well, lets get started! 1. Get the car on the lift, or some stands. At a bare minimum, you need to jack up the right side of the car. Disconnecting the battery is never a bad idea either. It makes sure that the car won't be accidentally started or turned over at the wrong time. 2. Remove the right rear wheel. 3. Remove the fender liner. There are just a bunch of screws holding it in. Once the screws are out, you will need to twist and rotate it a tad to sneak it out of the opening. Be careful not to scratch the paint on the way out. It is made of fiberglass and can be twisted a tad to get it out. 4. Now that the liner is out, you can see the right side of the engine. Please pardon the extreme dirtiness of this engine. I would like to claim it's not my car, but it is. My only defense is that I took these pictures soon after acquiring the car and hadn't had a chance to go through it yet.
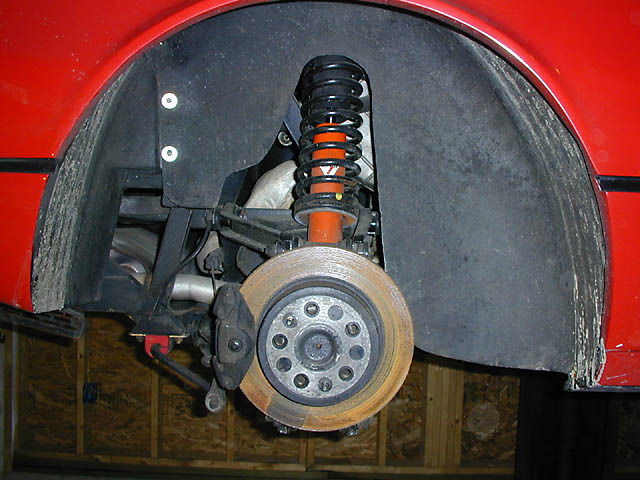
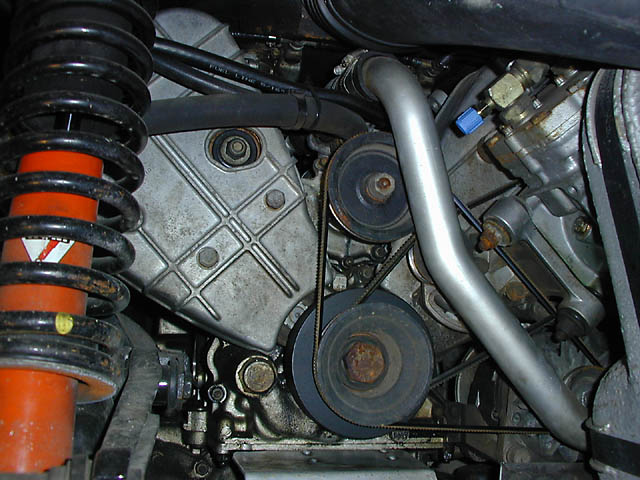
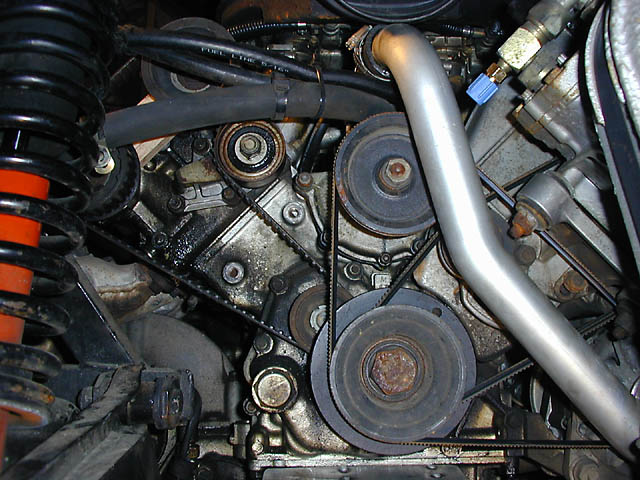
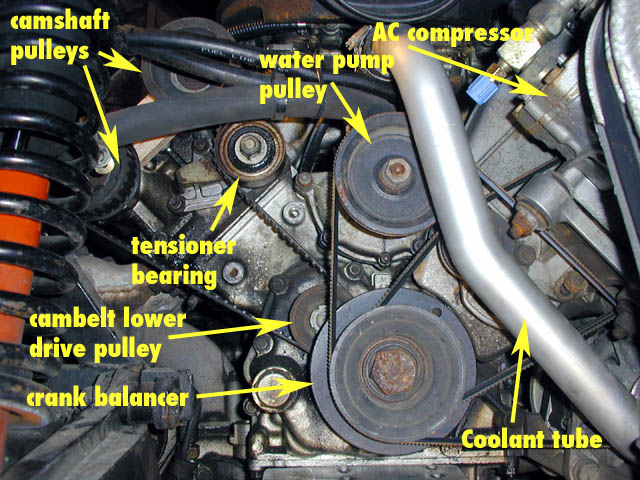
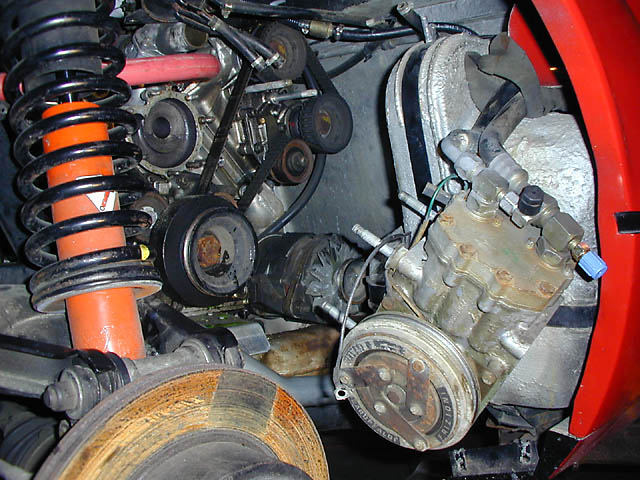
5. Remove the fiberglass "tube" that connects the intake duct to the airbox. Here's a close-up of the engine showing the accessory belts, rear bank cam belt cover, and the coolant tube that crosses in front of everything. 6. Just a few very obvious bolts can be removed and the rear cam belt cover comes off, revealing the belt, pulleys and tensioner bearing. (Note: on the QV, the cam belt covers have a fiberglass shroud on the back which require some additional bolts to be removed. Feel around for them with your fingers and use a gearWrench on them.) It may be easier to pull the rear belt cover out through the top of the engine bay rather than through the wheel well. Our goal is to change the belt to a new one, replace the tensioner bearings (they should always be replaced along with the belts), re-tension the new belts, and close it back up. We have to do this for both banks of cylinders. On the 308, the rear bank is easy to reach and the front is harder. On the Mondial the rear is actually harder than the front because of the engine being further back in the frame.
7. To get to the front bank requires removal of some other stuff first, including the coolant pipe, accessory belts, AC compressor and the front cam belt cover. To begin, you need to get the coolant tube out of the way. (Note: on the Mondial, the coolant tube can stay-it does not get in the way, so the coolant doesn't have to be drained). Start by draining the coolant. There is a petcock below the exhaust manifold on the rear bank. Open it and catch the coolant in a bucket. Removing the filler cap on the expansion tank allows air in so it will drain faster. Once it has drained low enough to stop flowing, disconnect the hose clamp at the top of the aluminum coolant pipe where it is joined by a rubber hose to the pipe on the top of the engine block. Now loosen (no need to remove) the clamp to the hose at the bottom of the coolant pipe. Place a bucket underneath and remove the coolant tube from the top and rotate it downwards, as illustrated in the picture. More coolant will come out, so be ready with the bucket. You can simply leave the tube in this position for the remainder of the process. You don't need to physically remove the tube from the car. Tip: There is a cover underneath the car just behind the front spoiler that provides access to the coolant hose connections (among other things) heading to the radiator. In there is a nice heater hose that you can remove to take the coolant out of the car with less mess than using the engine drain.
8. Next you need to remove the accessory belt(s). Early 308s use one belt in a triangular path between the crank, water pump (above) and alternator. Later cars use two separate belts-one for the water pump and a second for the alternator. In early cars, loosen the adjuster bolt on the alternator, pry the alternator up a tad to put some slack in the belt, and then remove it from the three pulleys. In the case of a later model 308, you will need to remove the alternator belt in the same way, then loosen the tensioner on the water pump belt and remove that belt separately. (No picture of this, sorry). In the single belt design, the tension in the belt is set with the alternator. In the double belt design there is an added tensioner assembly for the belt on the water pump. You will also have to remove the alternator tensioning bolt from the curved adjuster because the adjuster is connected to the forward cam belt cover and will come out with the belt cover. 9. Next look up over your head at the vapor-recovery canister inside the top of the wheel-well. You will need to pull the small lines from this to make room for the compressor. Any of these lines that can be replaced should be while you're here. They are old and cracked and represent a fire hazard.
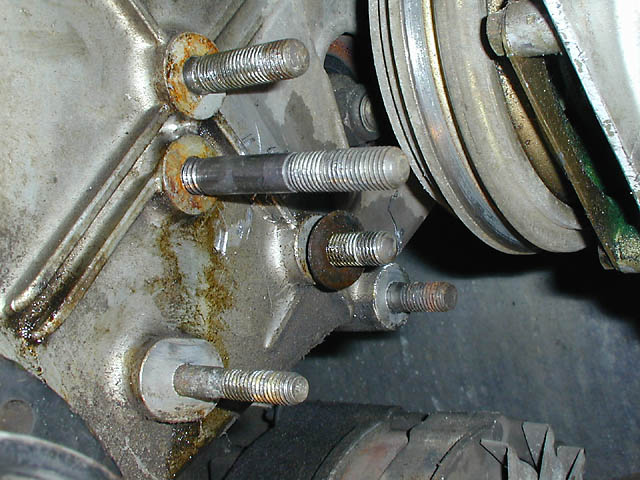
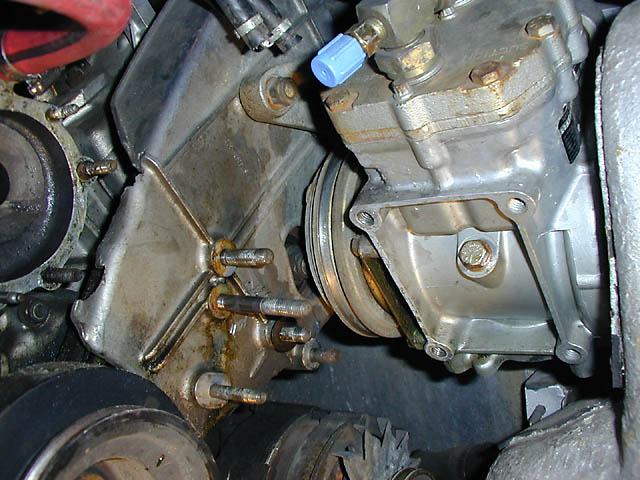
10. Now it's time to remove the AC compressor. Don't get worried, it's not as hard as you think! There's a belt tensioner with two bolts holding it on and a large L-shaped bracket connected to the cam belt cover with three bolts (one is shared with the tensioner). There are two large bolts holding the AC compressor to the L-Bracket. Start by removing all the nuts. Next, there are two bolts holding the top of the compressor to another bracket. Those are accessible through the top of the engine compartment. To get the compressor out, you need to remove the lower L-bracket. What you will find is that the studs must be removed from the AC compressor to wiggle that bracket out. You can either double nut them or use a stud puller. I'm a big fan of these stud pullers. They are not too expensive and work like a charm.
As you remove the L-bracket, pay particular attention to the washers and spacers between the compressor, L-bracket, and studs. These are shims to properly align the compressor with the drive belt. Make careful notes so you can re-assemble the same way it came apart. Now you can drop the compressor down off the top bracket and slip the belt off the compressor pulley. Same deal here with spacers. There are spacers on the top of the compressor too, and if they fall out and hit the floor, you will have some investigating to figure out where they came from.
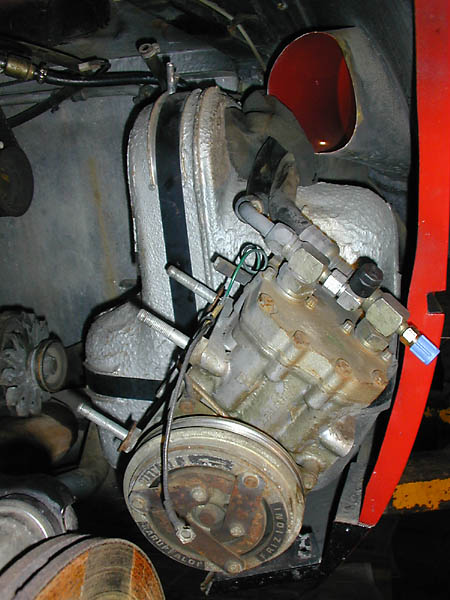
Of course, you don't want to remove the AC lines from the compressor and let out your refrigerant, so the trick here is just to get the compressor out of the way, not totally remove it. Because you removed the lines from the vapor recovery canister, now you can hang the AC compressor by its AC lines from the top of the fuel tank. Just drape the lines over there and hang the compressor.
Next, remove the upper AC bracket from the cam belt cover. You must do this because the cam belt cover won't come off without removing those bolts. BEWARE AGAIN-very important AC alignment shims are in there. Take note of their locations!
11. Now you can remove the front cam belt cover. Voila! Now you have access to the front cam belt!
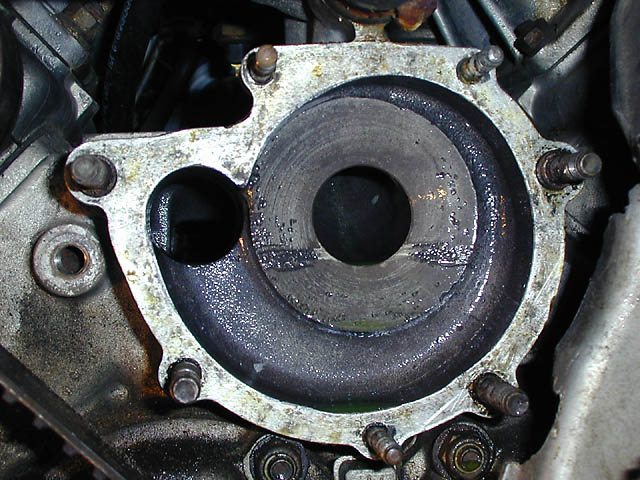
12. Now you need to lock the cams at TDC. Theoretically, you don't need to lock it at TDC, but could lock it anywhere, but doing it at TDC means you know if it moved, so it's a good idea. You will need to view two inspection ports to accomplish this quickly and easily. First, you need to remove the flywheel inspection cover, right below the oil filter so you can see the timing marks on the flywheel. Also, you need to remove the oil filler cap so you can see the mark on the rear bank intake cam.
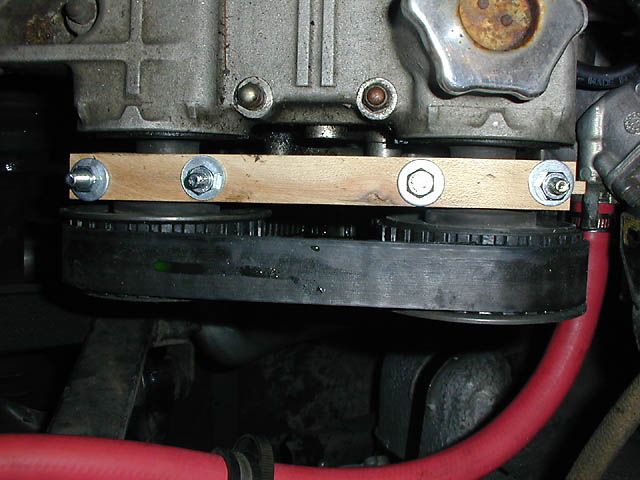
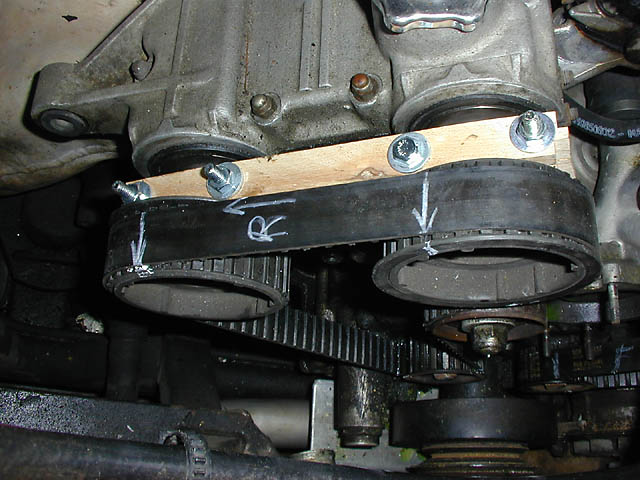
Using a 36mm socket on the crank balancer, rotate the engine clockwise while someone else watches for the TDC mark on the flywheel. Once you reach the TDC mark, look in the oil filler for the timing mark on the cam. If there is no timing mark on the cam, you need to go around another 360 degrees on the crank. (Remember that the crank rotates twice for each revolution of the cam shafts, so it takes two complete rotations of the crank to go through a full engine cycle.) If you shoot slightly past the timing mark, use a pen to make an approximate mark on a conspicuous spot on the crank balancer so you can approximate it, then go around again. DO NOT reverse the engine turning direction to get the marks on, because it will be pulling the timing belts in the wrong direction. It won't hurt the engine, but it will put the drivetrain "slack" in the wrong direction. Once the TDC mark on the flywheel is lined up with the index mark, and the camshaft mark is lined up with the index mark on the cam cap, you are ready to lock the camshafts and the engine. (NOTE: If the cam mark doesn't line up when the flywheel TDC mark is lined up, you need to pull the cam covers and reset the timing on all 4 cams! That is not covered here---seek professional assistance!) First lock the engine by putting the car in 5th gear and setting the parking brake. The combination of the parking brake and gear ratio means that it will be very hard to turn the engine accidentally. Locking the cams is easy. Verell can sell you the right cam lock for your car. The 2 valve cars have a wider cam spacing and stick out pretty far from the back. They are easily locked with simple hardwood locks like the ones I made from maple, clamped onto the shafts. (Don't laugh, a hardwood like maple is perfect for this application because it's easy to machine and strong enough to clamp the cams, but not hard enough to damage them!) The 4-valve cars have a closer cam spacing and don't stick out of the block as far, so they are clamped with a pair of wedge-shaped locks that go between the cam pulleys. Don't torque them too tight...they just need to keep the pulleys from slipping and that's all.
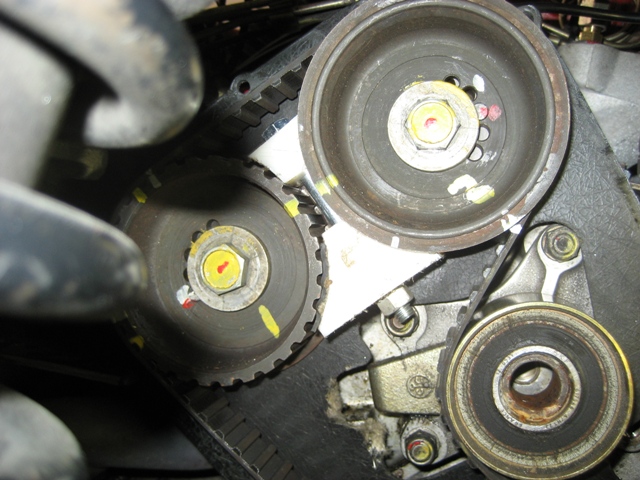
Once the cams are locked so they won't move when you remove the belts, we can get to the actual belt change! 13. The first trick is to make a mark or two on each pulley and also on the belt with a grease pen, paint pen or a silver sharpie. These marks will be used to insure that nothing has moved when we put the new belts on.
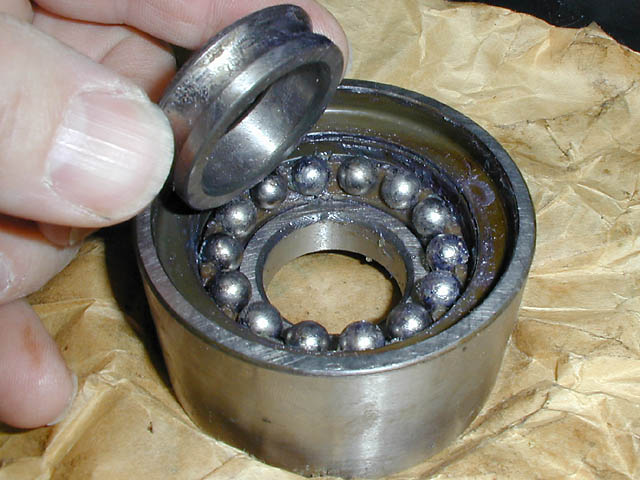
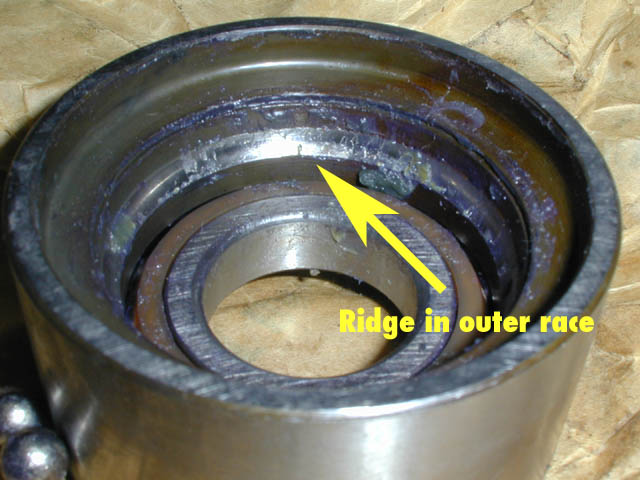
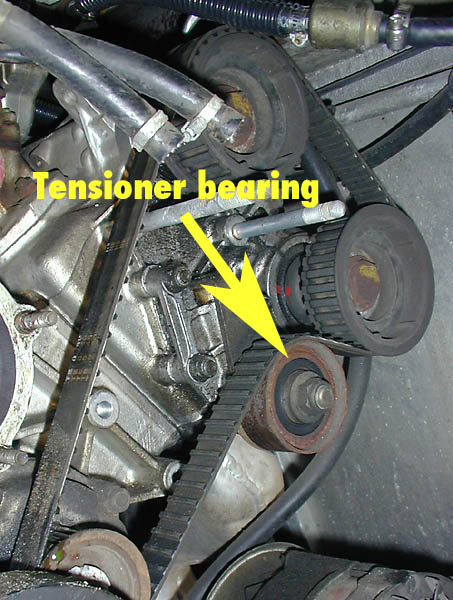
Once there is a mark on each toothed pulley (including the drive pulleys at the bottom of the engine) you can remove the belts. Be sure to mark each belt's position in the car (front or rear). To remove the belts, you need to first remove the tensioner bearing by removing the big bolt in the middle of it. I personally suggest doing one bank at a time--basically remove and replace the belt on the rear bank and then do it on the front. Why? With the cams locked, you can't move the engine as long as one of the timing belts is still on. Worst thing you can do here is move the crankshaft with the cam belts off. You could bump pistons into valves. Even though you have "locked" the drivetrain with the transmission, let's just be safe. Do the entire rear bank (which is easier to reach) and then once you know how to do it, do the front bank. But I'm getting ahead of myself.... CAUTION! It's hard to explain how the bearings are made, but they will come apart if you pull them off by the outer pulley part. The bearings are held together by the bolt in the middle, pushing the two inner races together and holding the ball bearings inside. The outer race (i.e. the part the belt rides on) is only held to the inner race by the plastic seals. If you grab the bearing by the outer race and pull, the bearing will come apart in your hands. You need to ever so gently wiggle and coax the bearing off the shaft. Of course, if you destroy the old bearing getting it off, the only real issue is the ball bearings all over the floor. You are not going to re-use this bearing anyway. (Repeat after me: "I will not re-use the tensioner bearing because they are the cause of many belt failures.") A further discussion on the tensioner bearings is located at the bottom of this document.
14. Once the tensioner is off, the timing belt will come off very easily. At this point, the crankshaft is no longer connected to the cams via belts. This means that you can very severely damage your engine if you were to turn the crank because the pistons will move up and down, but the valves will not move to get out of their way. DO NOT turn the engine! If someone were to accidentally crank the engine with the ignition key at this point, you would be one sorry 308 owner. (This is why you disconnected the battery!) Again, by locking both sets of cams and doing one bank at a time, we minimize this possibility. 15. Now remove the tensioner spring assembly from the engine and disassemble, clean, lube and reassemble. These need to be clean because the spring in this assembly is what sets your belt tension when you re-assemble.
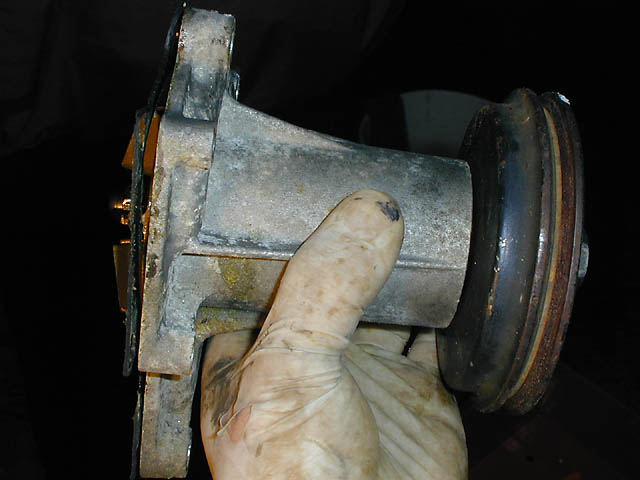
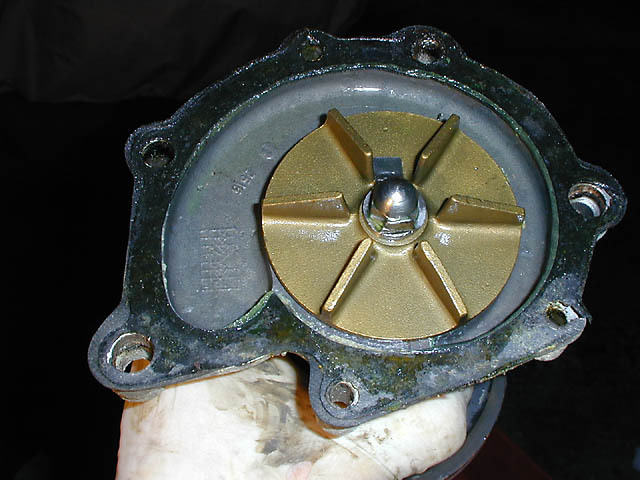
Now is also a good time to remove and rebuild the water pump. On early 308s, the water pump could not be removed without removing the front cam belt cover. On later cars, (starting with the injected models I believe, but don't quote me! I need a confirmation on that) they added cutouts to the front cam belt cover which allowed removal of the water pump very easily. If you have an early car, DEFINITELY rebuild the water pump now because doing it later requires removal of the AC and everything!
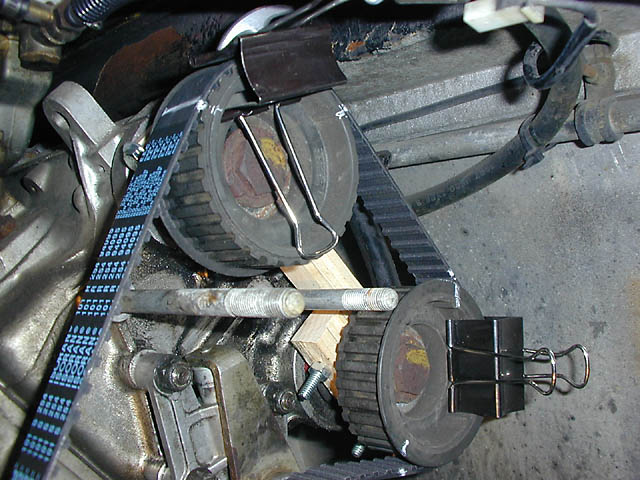
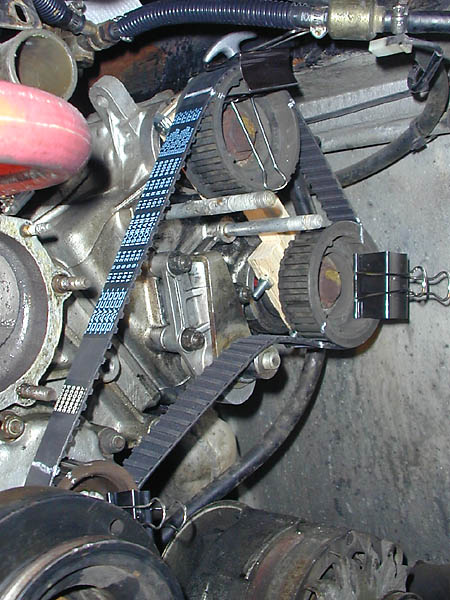
16. Once the tensioner assembly is cleaned, lubed and re-installed, you are ready to put the new belt on. Begin by transferring the alignment marks from the old belts to the new ones. You need to carefully line up the teeth side by side, make the marks, and work your way around the belts, tooth at a time, so that the new timing belts have the marks in the same exact positions relative to each other as the old belts. This is just a sanity check so that when the new belts are on, you can visually confirm that nothing moved by comparing these belt marks to the marks you made on the pulleys. 17. Now, starting with the rear bank (because it's easier to reach) place the new belt on the pulleys, lining up the timing marks on the new belt with the ones on the pulleys. Use large paper clamps available at an office supply store to clamp the belt so it won't jump off the teeth of the pulley. The belt is loose and floppy until you get the tensioner bearing on. Now, pull the belt back out of the way and slide the new tensioner bearing onto its shaft. It helps to have an extra set of hands because you can only get the bearing on if someone uses a pry bar to gently push back on the tensioner spring to buy you some freeplay. An alternate method is to mount the tensioner bearing first, then push it all the way back against its tensioner spring and lock it down by tightening the 19mm bolt in the middle of the bearing to hold it there. Mount the belt, then unbolt the tensioner bolt to allow the spring to push the tensioner bearing against the belt. I have never been able to get this procedure to work though! Now perform the tensioning procedure next...
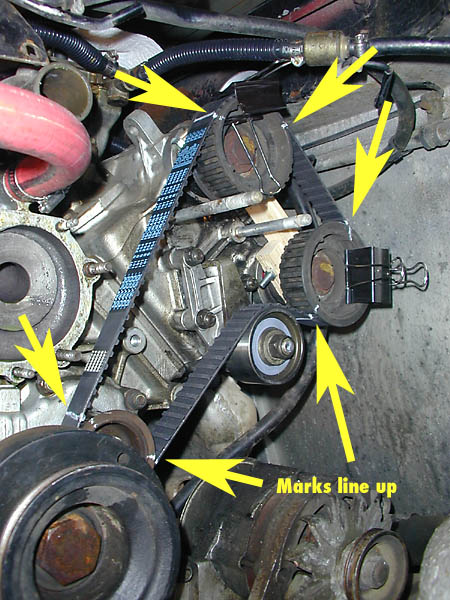
CAUTION! I'll remind you again. DO NOT push the tensioner bearing on by the outer race, or it will come apart in your hands. You must push it on by the INNER race. If you push it on by the inner race you can push as hard as you want. If you push on the outer race it WILL self-destruct. (And don't try to claim it was a bad bearing and get your parts place to send you another...anyone that has ever worked with these bearings knows they come apart when you handle them incorrectly!) Once the bearing is on, install the bolt, but don't torque it down yet. Now do the other bank. Once both belts are replaced and the tensioner bearings installed, check the inspection port on the flywheel. The PM 1-4 TDC mark should still be lined up. Now check the oil filler. The cam mark should still be lined up. If so, great, nothing moved and your timing is the same as it was when you started.
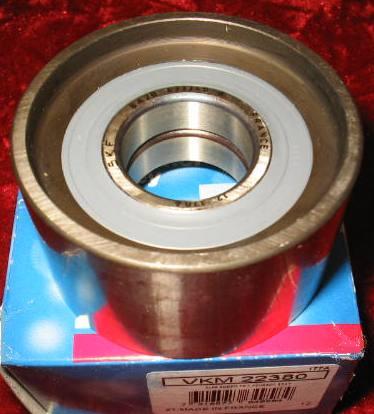
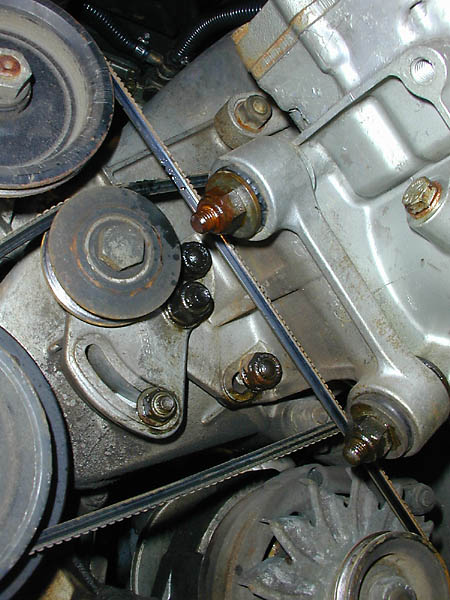
18. Once both banks have new belts and tensoiners, now you must tension the belts and lock the tensioners. This is not hard and there are two ways to do it. METHOD #1 (Verell's method - easiest and the way I do it) METHOD #2 (Ferrari's procedure) What is happening here is you are allowing the spring in the tensioner assembly to determine the right amount of tension at a point in the rotation where the tension is least. DO NOT push on the tensioner to apply "a little more tension to be safe." Worst case if you do that is that the belt will break pre-maturely and destroy your engine. Next worst case is that the excess tension in the belt will destroy the timing drive bearings in the lower timing pulleys. They are no fun to replace! Use the springs to set the tension as described! 19. Well, that's it...your timing belts are done. Now you just need to re-assemble everything in the reverse order. Don't forget to replace the AC belt and accessory belt(s) with new ones at this point! Re-install the water pump if you removed it, and the front cam belt cover. Re-install the top AC bracket with the shims in the right place, re-install the AC compressor while at the same time putting the belt around the pulley. Re-install the lower AC bracket, with shims, and the AC compressor studs. Install the AC belt and set tension. Re-install the small rubber hoses on the vapor canister (replace them if they are old), re-install the accessory belt(s) and tension them (anyone know the tension?) Re-install the coolant tube, being careful to align it properly--too close to the alternator and the alternator pulley will wear through it. Too close to the fuel tank and it will rub there as well. Next, re-install the rear cam belt cover, fill with new coolant (never re-use it if you can avoid it) and START THE CAR to test everything. It should be fine. Now shut it off, re-install the fender liner, put the wheel back on (72 ft-lbs on the lug bolts) and put the car on the ground. Now it will need a proper bleeding of the cooling system since there is air in there. A WORD ABOUT THE PARTS The original SKF tensioner bearings seem to have gone through a change. The "old style" bearings had a solid inner race and were much easier to handle without breaking. (See the picture comparing an old one with a newer style below). However, the supply of the old style ones seems to have dried up and everyone, including Ferrari themselves, are now supplying the "new style" with the split-design inner race. You can again opt to buy them in the yellow box (~$500 each at this time!!!!) or in the generic form direct from the manufacturer, which is SKF. The part number is VKM22380. Any bearing supplier can get it, but both Ricambi and Dennis McCann carry it for around $75. So you are only looking at around $250 or less for this whole job if you use the non-yellow box components. HOWEVER...there is a newer, better option for tensioner bearings! Hill Engineering is now making what I believe are the finest tensioner bearings on planet Earth for the 308. You can get them in the UK directly from Hill, but in the USA, it's cheaper (and way faster) to get them directly from their U.S. importer, Ricambi. As of this update (11/2011) they are $175/pair. Only $25/pair more than the SKF, but wait until you see them. They are gorgeous and worth every single penny. And they are not going to fail! This is what I put on my car in my most recent belt change.
A LOOK INSIDE THE BEARING
SPECIAL THANKS |


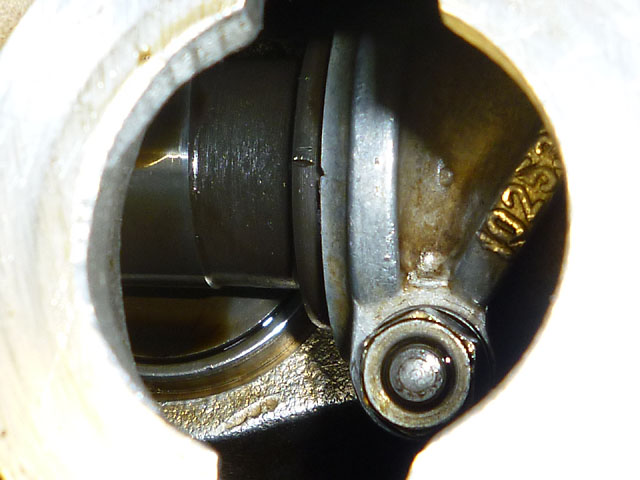 Here is a shot looking in through the oil filler on the cam cover. You can see the index mark on the exhaust cam is almost lined up with the mark on the cam cap. (Thanks to Kerry Chesbro for this pic!)
 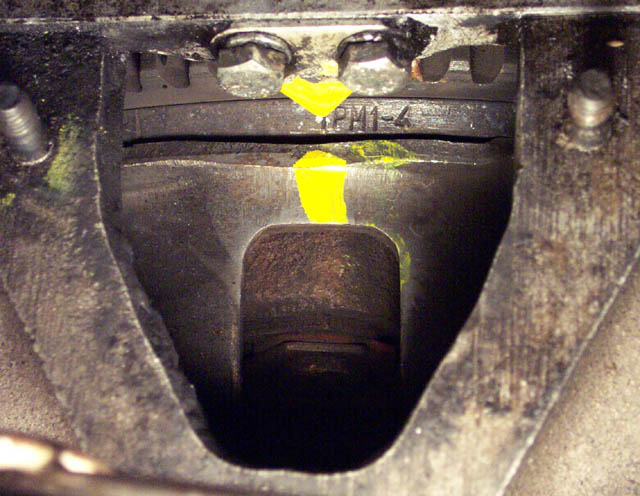 Flywheel inspection cover. Line up the "PM1-4" mark with the pointer on the engine. (In this pic, Verell painted the pointer yellow above the flywheel, and another mark on the clutch to make it easier to see. Thanks to Verell for the pic.)
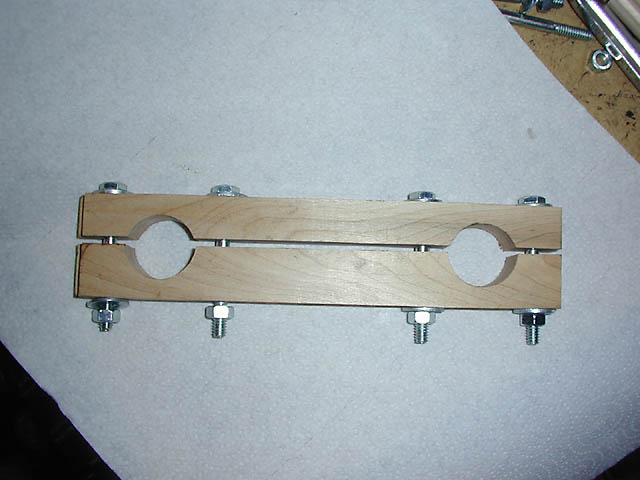
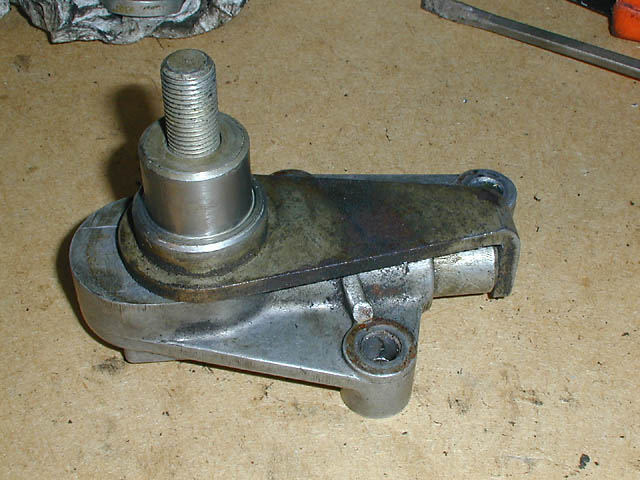 Tensioner bearing spring mount.
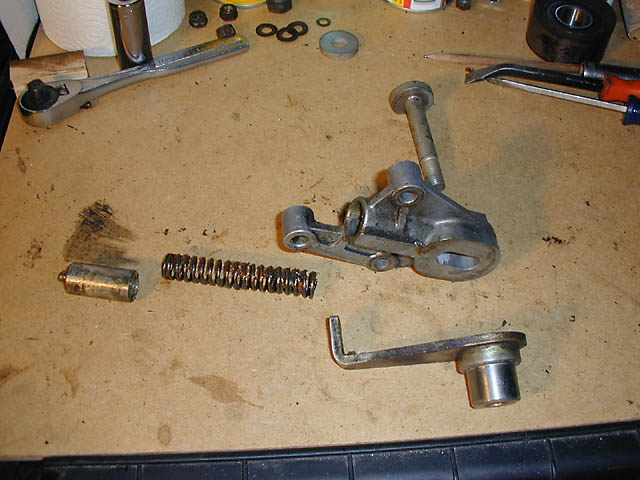
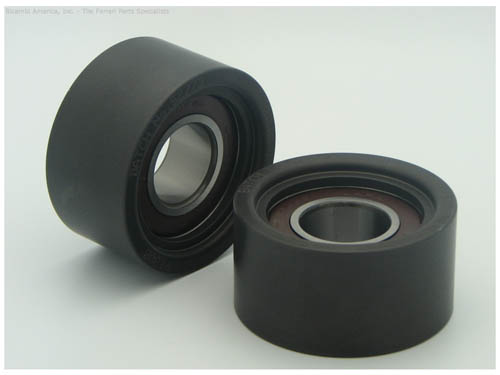
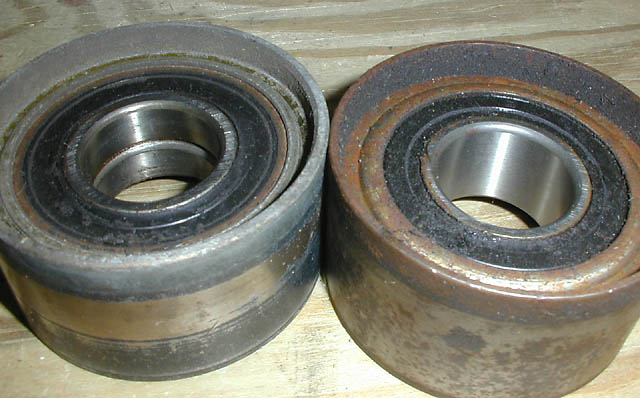 New style on the left with split inner race. Old style on the right with solid inner race.