|
The Ferrari 308 thermostat and thermostat housing is maniacally odd and most people don't understand how it works. Worse than that, the original OEM thermostat made by Savara is no longer available, leading people to substitute all kinds of oddball thermostats to do the job. In this tutorial I'm going to explain how the thermostat works, what to replace it with when it breaks, and why you need to use the right replacement--not just something that fits from NAPA. HOW IT WORKS First, lets take a look at how the thing works with my horrible sketch of the water pump/thermostat housing. Please forgive my pathetic art talents, you can see why I'm a photographer and not a painter. The sketch below shows the water pump/thermostat housing as seen from the back of the car with a cold engine. The thermostat on a 308 has a top valve and a plunger which is also a valve. I don't like to say that the thermostat is "open" or "closed" because the nature of a thermostat like this is that when the top valve is open, the plunger closes the bottom, and vice versa. This is a dual-throw type of thermostat. So when the engine is cold, the top of the thermostat is closed and the bottom plunger is open, and water circulates from the engine, around through the water pump and right back into the engine. This allows the engine to heat up fairly quickly by recycling it's own heat. No coolant goes to the radiator.
Things get a little more interesting as the engine warms up. Once this happens, the coolant starts to get pretty warm, and the thermostat does what it's supposed to do, which is open up the top valve. But at the same time, the plunger gets pushed down and closes the bottom of the thermostat by pushing against the housing. Now the water pump pushes water into the engine. When it comes out of the engine very hot, it is sent to the radiator. Cooled coolant comes back from the radiator and through the water pump, back into the engine.
An old trick with overheating cars to troubleshoot the problem was removing the thermostat entirely. You can see why you cannot remove the thermostat with this design. Water would not get sent to the radiator! The car will overheat promptly without a thermostat. So that's how the system works. THE THERMOSTAT A thermostat is kind of low-tech. Most of them operate with a ball of wax in a cylinder in the center of the thermostat. At a certain temperature, the wax will start to melt and expand, pushing the thermostat open against the tension of a spring. Sometimes however, they fail. Usually they fail because some of the wax escapes and the thermostat no longer opens enough, so water cannot flow through sufficiently and the car runs hot. Sometimes the spring loses tension and the thermostat opens too soon, causing the car to run too cool. Believe it or not, it's almost as bad for your engine to run too cool as it is to run too hot. The tolerances in an engine are designed for an optimum temperature. Many engines run quite poorly when they are not warmed up, and the Ferrari 308 carbed engines are one very good example. My car started running poorly and I noticed that in cool weather, the engine couldn't stay warm (a drive on a fall day, the needle barely made it above 140!) I had a bad thermostat. When I pulled the thermostat out and measured it in water, it opened way way sooner than it should. (You can test them by putting in water, slowly bringing the water to a boil and measure the temperature of the water when the thermostat opens fully.) I replaced the thermostat with a new one and the car ran much better, warmed up faster, and held the proper temperature even on a cold day. But finding a replacement? Now that was an adventure! Behold, allow my effort to save you some hassle! Below is a picture of three thermostats that will fit and (mostly) function in a 308. The one on the left is my faulty OEM Savara. It is the thermostat that Ferrari used when the car was built. Savara part number 9.10.358.00. They are no longer made. Best I can tell Savara is out of business. On the far right is a Stant that you can get for about $10 at NAPA. It will fit the car but it has a slightly smaller flange size at 54mm. The plunger is the right size to work. However, the hole in the middle of the thermostat (what I'm calling the Inner Diameter "ID" on the pic) is quite a bit smaller. The Savara has 754 square millimeters of area in the hole for coolant to pass through, and the Stant only has 615. That's 18% less flow. Enough to make a difference? Maybe. Maybe not. I wanted to find a better option. Eventually I hunted down the Wahler in the middle (I bought a lot of thermostats that were wrong first, so let my experience save you some time!) Is has the same basic dimensions as the Savara. It's a tiny bit smaller in OD, but it fits in the thermostat housing. But it also is 54mm flange, not 56mm. Keep reading!
The Wahler is a German thermostat used in VW and other brands. It seems pretty well made. Here are the models: 056 121 113 A = 80° C (176° F) These model numbers by the way are not the Wahler part numbers but the Audi/Volkswagon cross references. If you search on the Wahler number (variations on 4253) you won't find them on-line very easily. And these numbers will also cross-reference to other brands. So if you want the Wahler, search on that part number but check to be sure you are getting a Wahler and not some other brand. For the QV, David suggests a 160° F (71° C) thermostat. He says the higher heat output of the QV really does better with the cooler thermostat. However when I put one in my car, it wouldn't warm up enough on a nice drive on a fall day that was 60° outside. Here's my guage. Imagine driving on a really cool day!
I elected to test the A model (80° C) for my carb car and I think that's a better choice for carb cars. Incidentally the stock thermostat is 92° C but we both feel that is too warm. Getting the water to the radiator before it gets that hot really helps the car in hot weather. However after using one of these for a couple years, I do not recommend these thermostats. Say WHAT? THE PLOT THICKENS The Wahler and the Stant have 54mm flanges, so they don't necessarily stay centered in the thermostat housing. These thermostats can wiggle around a little within the rubber seal that retains it because there is 2mm of "slop." When the car is cold, the bypass plunger is retracted. As the car gets hot, the plunger starts to go down, to seal off the direct return from the engine, so all the coolant will come from the radiator. The plunger has to fit into a shallow cylindrical depression in the bottom of the thermost housing to seal it. The 54mm thermostats have just enough wiggle room that occasionally when the plunger goes down, it's not aligned with the depression in the bottom of the housing and thus will not completely shut off the direct return from the engine. This allows some hot coolant from the engine to sneak around and mix with the coolant coming back from the radiator. So the car runs a little hotter than the thermostat should allow. As you drive down the road, the engine is vibrating, the flowing coolant has turbulence, and eventually the thermostat wiggles around into a position where the plunger can finally snap down into the depression. It seals the bottom and the temperature settles right down to where it belongs. So basically, you can't get reliable performance from any thermostat that has a 54mm flange. You really need a 56mm flange like the original Savara. This is easier said than done because this thermostat size is much rarer. The OEM Savara cross references to the one used in the Fiat X1/9 (search for Fiat part number 1430640). It seems that Ferrari used the same thermostat across several lines of cars. Several manufacturers make a thermostat that is dimensionally acceptable, though the hole in the middle of many of them are not as large as the Wahler and Savara. The Wahler 4033.82D is absolutely perfect, (it's the 56mm version of the one I was using from above) but I can't seem to buy one anywhere. It's in their catalog but not available. If you are in Australia/New Zealand, The Tridon TT235 looks excellent too, but hard to get in the USA. However, I have found two that fit which are available. The Beck/Arnley 1430640 (which is easily obtainable but they don't always send you the 56mm version so you may want to call and make sure before ordering) and the Behr B296.82 (which is harder to find but you can get it here.) They are both specifically made for the Fiat, 180° temperature, correct dimensions. These are my recommended thermostats for the 308. Note: it's worth pointing out that David Feinberg has never once seen this 54mm versus 56mm thermostat issue in another 308, and he has been fixing them for ages. He swears by the 54mm Wahler and it seems fine in every car he has serviced. It's possible that my thermostat housing is worn or misaligned or something and my car is just exceptionally picky. I will warn you--finding a 56mm thermostat is really difficult and you may want to just try the 54mm first! INSTALLING When you take the old thermostat out, keep the fancy grooved rubber seal that goes around it. The new thermostat comes with an o-ring that will not work in the Ferrari. You can discard it. If your rubber thermostat seal is damaged, get a new one. And plan to pay through the nose...about 5 times what the thermostat costs last time I checked!
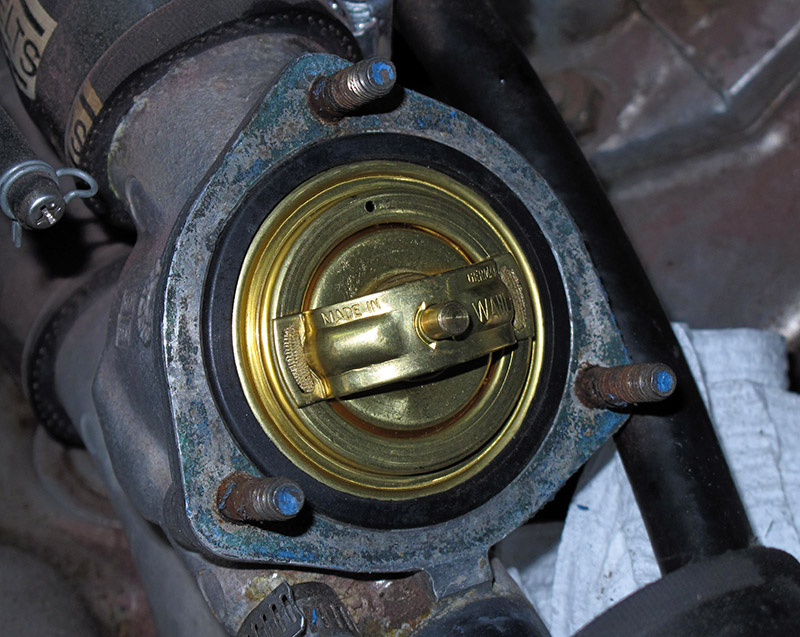
You can check that you have the right thermostat because the temperature is stamped on the bottom of the plunger. Note it's in °C.
There is one modification you will have to make to the new thermostat. You will notice that there is a nice bleeder screw on the top of the thermostat housing to allow you to bleed the air out of the system when you fill it. However, since the thermostat top valve is closed at room temp, in order to get all the air out, the OEM Savara thermostat had a tiny hole drilled in it to allow air through when bleeding. Not enough coolant can flow through this tiny hole to affect your cooling system. It's just for bleeding. You should drill this hole with a #52 drill (~0.06") or thereabouts. Remember, it's supposed to be pretty small. To make it easy, the Wahler has a dimple where you should drill it. Easy! This pic shows pre and post drilling and where to drill.
Very easy to drill with a drill press or a hand drill. Just support the thermostat well so you don't break your fragile bit:
Even if you don't need a new rubber seal around the thermostat, you will want to replace the gasket. They are super cheap.
With your bleeder hole drilled and rubber seal installed (preferably new, but recycled if in good shape) you are ready to go:
Pop it in place, and here's the important part: make sure the bleed hole is at the top so the air can flow out at the highest point. Then make sure it's seated all the way around, install the gasket and bolt it together. I like to apply a very thin coating of high temp sealant to the gasket to be sure it won't leak. Super thin! Just squirt some on your finger and then apply it to both sides of the gasket. Just a tiny, thin coating. Don't over-torque the nuts. Wait a day for the sealant to cure and fill it with coolant. Bleed and drive!
|